Oxidized Gitlab Storage Backend
published: 3rd of June 2018
Intro
In a previous post I installed and configured Oxidized using the local file system for storage. In this post I will configure Oxidized to use Gitlab community edition as a storage backend.
For reference the following software will be used in this post.
- Oxidized - 0.21.0
- Oxidized Host - Debian 9
- Juniper vSRX - 12.1X47-D15.4
- Cisco IOSv - vios-adventerprisek9-m.vmdk.SPA.156-1.T
Install Dependencies
In order to use Git with Oxidized a couple of dependencies will need to be installed. Git is required, the other dependencies will vary based on the operating system.
sudo apt install -y git zlib1g zlib1g-devNow install the rugged gem.
sudo gem install ruggedConfiguration
Oxidized User Configuration
In order to push to git the oxidized users git config parameters need to be set.
sudo -H -u oxidized bash -c 'git config --global user.name "oxidized"'
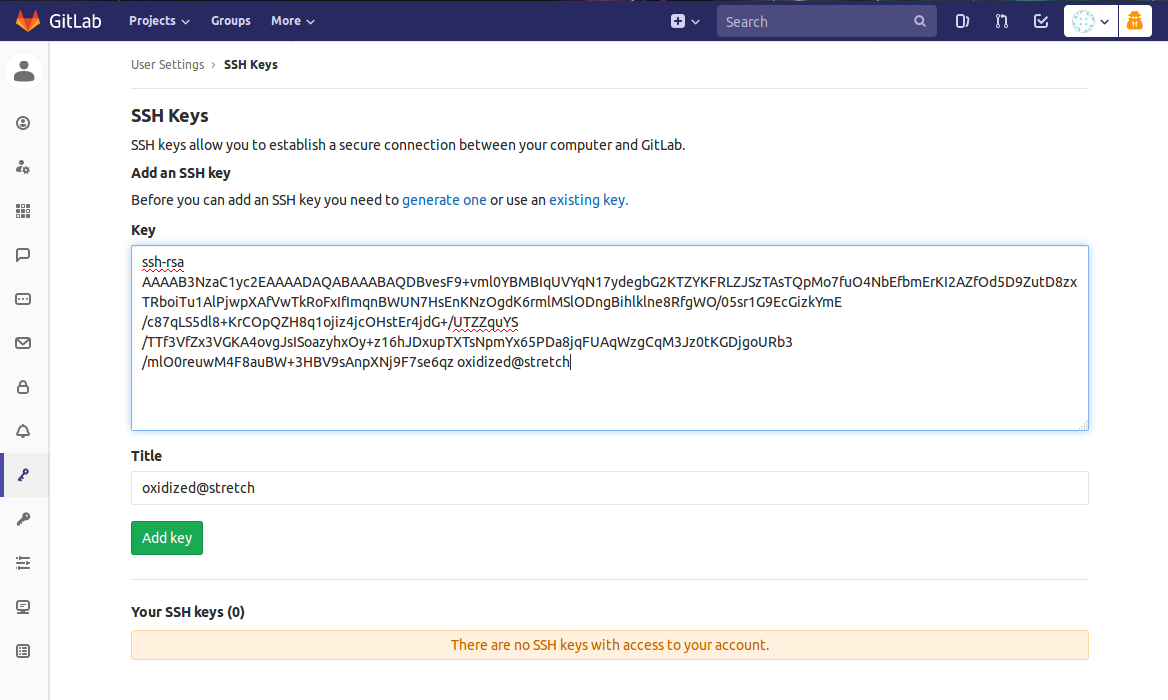
sudo -H -u oxidized bash -c 'git config --global user.email "oxidized@oxidized.local"'Oxidized will push configs to Gitlab via ssh. In order for this to happen the oxidized users public SSH key needs to be uploaded to gitlab. First create SSH keys for the oxidized user.
sudo -H -u oxidized bash -c 'cat /dev/zero | ssh-keygen -q -N ""'

# output

Enter file in which to save the key (/opt/oxidized/.ssh/id_rsa): # press enter
cat the oxidized users public ssh key. The output will be added to the oxidized user account in gitlab in a later step.
sudo cat /opt/oxidized/.ssh/id_rsa.pub

# output

ssh-rsa AAAAB3NzaC1yc2EAAAADAQABAAABAQDBvesF9+vml0YBMBIqUVYqN17ydegbG2KTZYKFRLZJSzTAsTQpMo7fuO4NbEfbmErKI2AZfOd5D9ZutD8zxTRboiTu1AlPjwpXAfVwTkRoFxIfImqnBWUN7HsEnKNzOgdK6rmlMSlODngBihlklne8RfgWO/05sr1G9EcGizkYmE/c87qLS5dl8+KrCOpQZH8q1ojiz4jcOHstEr4jdG+/UTZZquYS/TTf3VfZx3VGKA4ovgJsISoazyhxOy+z16hJDxupTXTsNpmYx65PDa8jqFUAqWzgCqM3Jz0tKGDjgoURb3/mlO0reuwM4F8auBW+3HBV9sAnpXNj9F7se6qz oxidized@stretch
Gitlab User Configuration
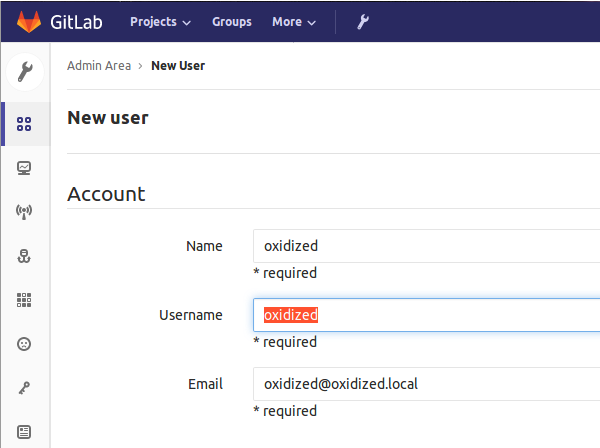
Create an oxidized user in Gitlab. Filling in the name, username and email then press the save button.
Either login to gitlab with the oxidized account or use the root/admin account to impersonate the gitlab user in order to add the oxidized users SSH keys. Paste in the public ssh key from the previous step.
Gitlab Project
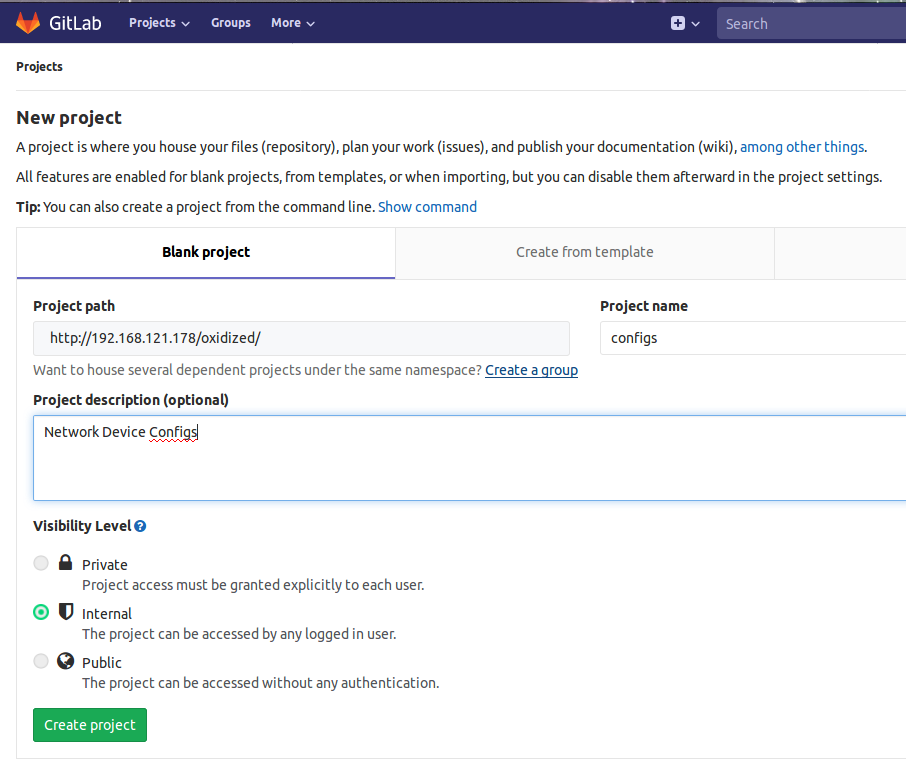
Create a project in order to store the device configurations. Fill in the required details. I am calling this project configs .
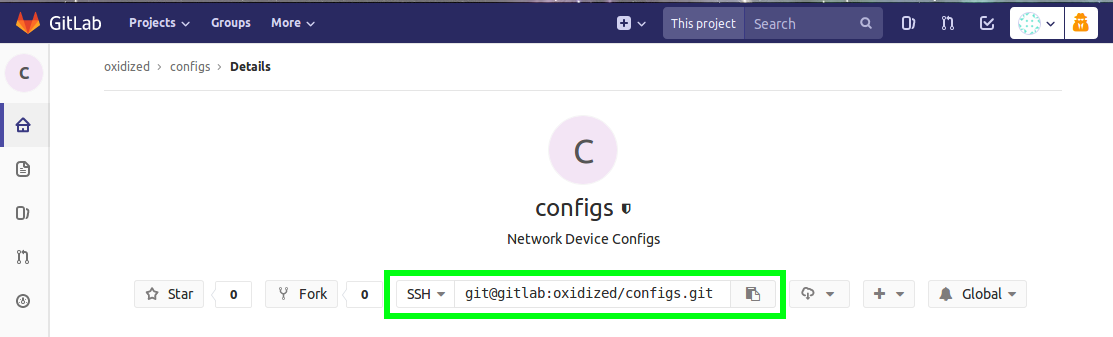
Navigate to the project and copy the project git url. This will be required for the configuration on the oxidized server.
Oxidized Config File
Back on the Oxidzied server, edit the /opt/oxidized/.config/oxidized/config file. I will be using the configuration file from my getting started post.
Edit the output section adding the following git config.
output:
  default: git
  git:
    single_repo: true
    user: oxidized
    email: oxidized@oxidized.local
    repo: /opt/oxidized/output/configs.git
This config instructs Oxidized to create a bare repo on the local host to store the device configurations.
Add a hooks section that defines the details of the Gitlab repo url from a previous step. The below config will attempt to push to the remote repo when a diff in a devices configuration is detected.
hooks:
  push_to_remote:
    type: githubrepo
    events: [post_store]
    remote_repo: "git@gitlab:oxidized/configs.git"
    publickey: /opt/oxidized/.ssh/id_rsa.pub
    privatekey: /opt/oxidized/.ssh/id_rsa
The full configuration is below for reference.
# /opt/oxidized/.config/oxidized/config

username: vagrant
password: vagrant
model: junos
interval: 3600
use_syslog: true
log: /opt/oxidized/.config/oxidized/logs/
debug: false
rest: false
threads: 30
timeout: 20
retries: 3
prompt: !ruby/regexp /^([\w.@-]+[#>]\s?)$/
next_adds_job: false
pid: "/opt/oxidized/pid"

input:
  default: ssh
  debug: false
  ssh:
    secure: false

output:
  default: git
  git:
    single_repo: true
    user: oxidized
    email: oxidized@oxidized.local
    repo: /opt/oxidized/output/configs.git

source:
  default: csv
  csv:
    file: /opt/oxidized/.config/oxidized/router.db
    delimiter: !ruby/regexp /:/
    map:
      name: 0
      ip: 1
      model: 2
      group: 3
    vars_map: {}

model_map:
  juniper: junos
  cisco: ios

vars: {}

groups:
  juniper:
    username: vagrant
    password: Vagrant
  cisco:
    username: vagrant
    password: vagrant

models: {}

hooks:
  push_to_remote:
    type: githubrepo
    events: [post_store]
    remote_repo: "git@gitlab:oxidized/configs.git"
    publickey: /opt/oxidized/.ssh/id_rsa.pub
    privatekey: /opt/oxidized/.ssh/id_rsa
Restart the oxidized service to load the changes into the running application.
sudo systemctl restart oxidized.serviceVerification
Oxidized will attempt to fetch the configuration from all the devices in the data file. Confirm that the configuration was backed up by inspecting the output directory.
tree /opt/oxidized/output/configs.git/

# output

/opt/oxidized/output/configs.git/
├── config
├── description
├── FETCH_HEAD
├── HEAD
├── hooks
│   └── README.sample
├── index
├── info
│   └── exclude
├── objects
│   ├── 29
│   │   └── 026884319c5e6106f7a881a9baf1f070908065
│   ├── 4b
│   │   └── 825dc642cb6eb9a060e54bf8d69288fbee4904
│   ├── 4f
│   │   └── 3b1c4e61e7faf454c649ffdebfd45d5f30a77b
│   ├── 89
│   │   └── 9c241db65f454b0da932872f74475fa6835b30
│   ├── 8a
│   │   └── 38914166ff328499e41b5675abd552dfdacb1b
│   ├── aa
│   │   └── 70b15598cfc9e291defe2ff1ad8a41220151ab
│   ├── b4
│   │   └── cde70a2255372aaf1200e014fe51faca59c91c
│   ├── b7
│   │   └── debdf515c0ebf06ea31d25e0671edfafcb658c
│   ├── f2
│   │   └── cbaeb7e951a3107da76e46d559c6f6c0a2508c
│   ├── info
│   └── pack
└── refs
    ├── heads
    │   └── master
    ├── remotes
    │   └── origin
    │       └── master
└── tagsCheck the /var/log/syslog for the status of the git push.
sudo tail /var/log/syslog
# output
Jun 3 00:23:03 localhost systemd[1]: Started Oxidized - Network Device Configuration Backup Tool.
Jun 3 00:23:03 localhost oxidized[14751]: Oxidized starting, running as pid 14751
Jun 3 00:23:03 localhost oxidized[14751]: lib/oxidized/nodes.rb: Loading nodes
Jun 3 00:23:03 localhost oxidized[14751]: lib/oxidized/nodes.rb: Loaded 2 nodes
Jun 3 00:23:09 localhost oxidized[14751]: Configuration updated for cisco/ios1
Jun 3 00:23:09 localhost oxidized[14751]: GithubRepo: Pushing local repository(/opt/oxidized/output/configs.git/)...
Jun 3 00:23:09 localhost oxidized[14751]: GithubRepo: to remote: git@gitlab:oxidized/configs.git
Jun 3 00:23:18 localhost oxidized[14751]: Configuration updated for juniper/srx1
Jun 3 00:23:18 localhost oxidized[14751]: GithubRepo: Pushing local repository(/opt/oxidized/output/configs.git/)...
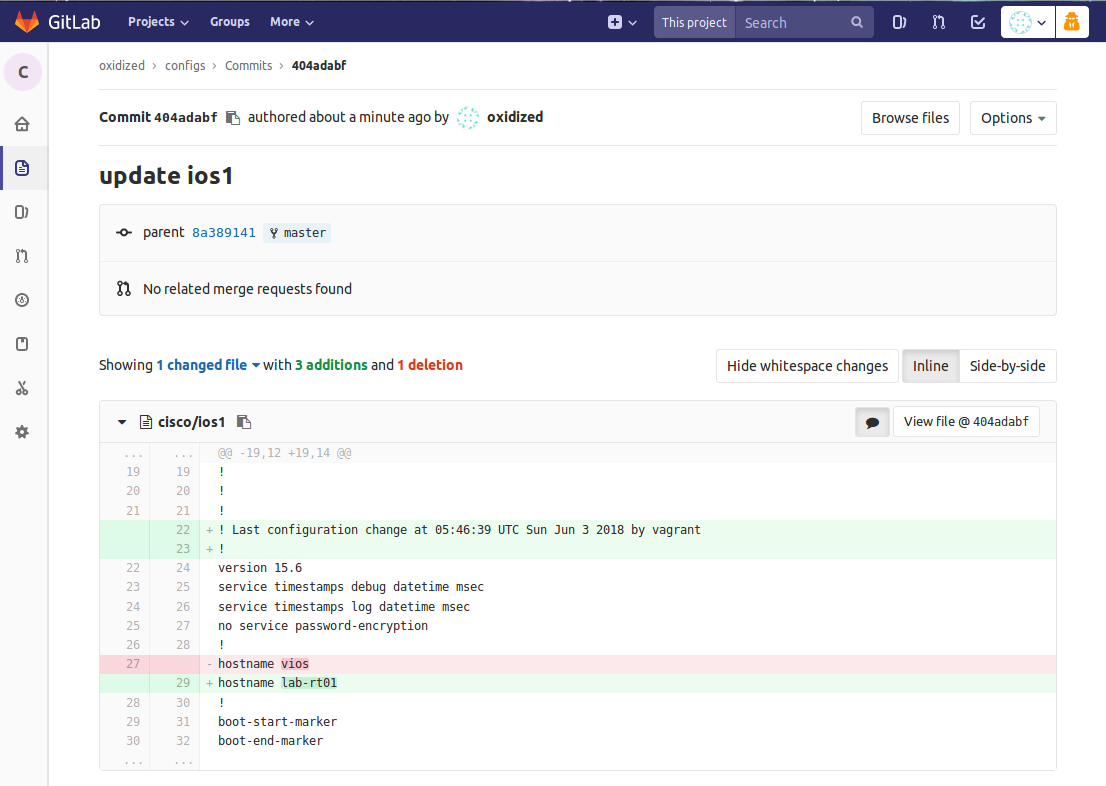
Jun 3 00:23:18 localhost oxidized[14751]: GithubRepo: to remote: git@gitlab:oxidized/configs.gitNavigate to the project and confirm the project is updated with the device configurations.
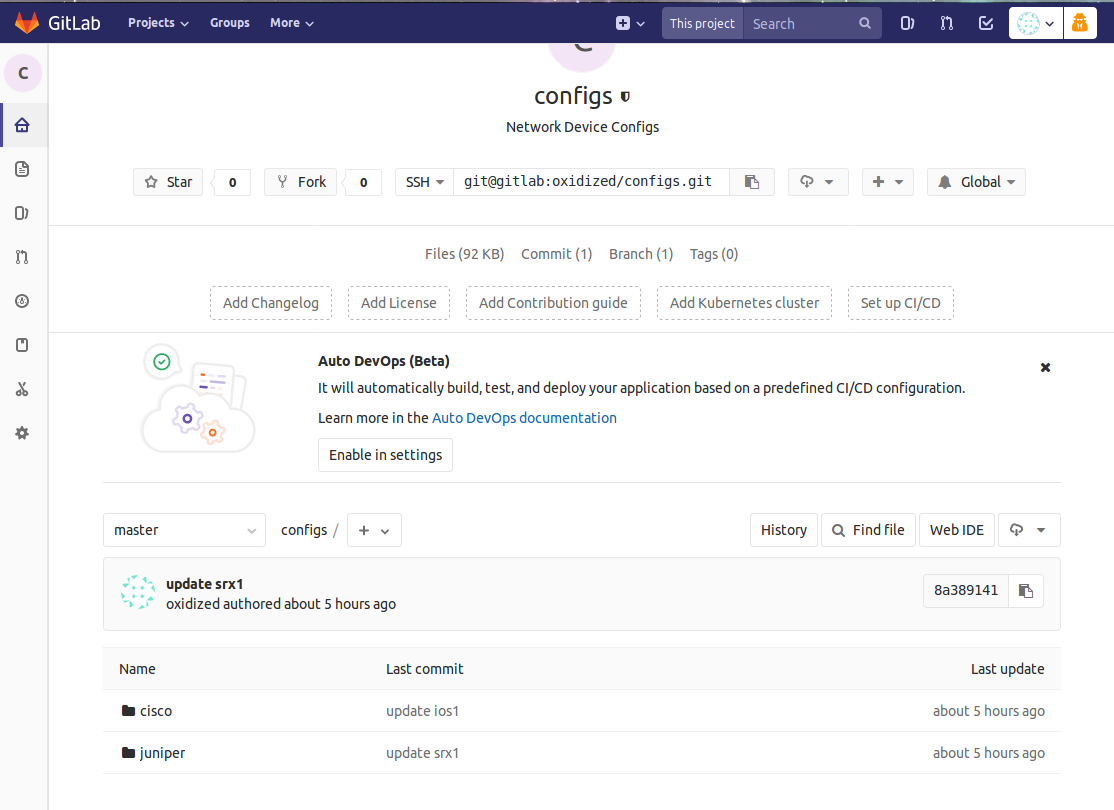
Storing configs in git has the advantage of remote config backup and change history over time, but my favorite feature is inspecting configuration diffs. Diffs can be viewed inline or side by side and you get a great visual representation of the changes which make things a little bit easier in a troubleshooting scenario.
Outro
Backing up your network device configurations should be considered a critical piece of operating a network. Oxidized helps simplify this process and using Git as a backend configuration store adds some great features such as version control history and visual diff inspection to this critical activity.
Links
https://github.com/ytti/oxidized
https://github.com/ytti/oxidized/issues/1038
https://askubuntu.com/questions/294736/run-a-shell-script-as-another-user-that-has-no-password
https://unix.stackexchange.com/questions/69314/automated-ssh-keygen-without-passphrase-how