Cisco SDWAN Self Hosted Lab Part 2
published: 3rd of June 2019
Intro
This is the second post in a two part series on building a self hosted Cisco SDWAN lab using an enterprise CA for certificates. You can find the first part here .
In this part I will install the controller stack:
- vManage
- vBond
- vSmart
Along with the WAN edges:
- vEdge
- cEdge
I am hosting this lab on an Ubuntu server running the KVM hypervisor. I will also use the vManage as the enterprise root CA server.
Pre Requisites
This post assumes that you have the KVM hypervisor already installed along with the libvirt management application. Additionally you will need the virt-install and cloud-localds CLI tools.
It is also assumed that you have downloaded the virtual disk images from https://software.cisco.com and the serial file from the PnP Portal generated in part one.
Lab Diagram
The following diagram depicts the topology for the lab.

vManage
Over on the build server, create a working directory and copy the VM image files to the directory. I will be working from the ~/sdwan-testlab directory which contains the following files.
tree sdwan-testlab

# output

sdwan-testlab
├── csr1000v-ucmk9.16.11.1a-serial.qcow2
├── sdwan-testlab.viptela
├── viptela-bond-19.1.0-genericx86-64.qcow2
├── viptela-edge-19.1.0-genericx86-64.qcow2
├── viptela-smart-19.1.0-genericx86-64.qcow2
└── viptela-vmanage-19.1.0-genericx86-64.qcow2The vManage requires a second disk for the database. Create a thin provisioned disk.
qemu-img create -f qcow2 vmanage-disk2.qcow2 100G

# output

Formatting 'vmanage-disk2.qcow2', fmt=qcow2 size=107374182400 cluster_size=65536 lazy_refcounts=off refcount_bits=16
Start the vManage installation
virt-install \
    --name vmanage \
    --os-type linux \
    --os-variant ubuntu14.04 \
    --cpu host \
    --vcpus=2 \
    --hvm \
    --arch=x86_64 \
    --ram 8192 \
    --disk path=viptela-vmanage-19.1.0-genericx86-64.qcow2,size=16,device=disk,bus=ide,format=qcow2 \
    --disk path=vmanage-disk2.qcow2,size=16,device=disk,bus=ide,format=qcow2 \
    --network=network:default,model=virtio \
    --network=network:default,model=virtio \
    --graphics none \
    --import
This will start the VM and attach to a virtual console. Once you see the message System Ready login with the username/password admin . You will then need to follow the prompts to initialize the database.
Sun Jun  2 03:33:42 UTC 2019: System Ready


viptela 19.1.0

vmanage login: admin
Password:
Welcome to Viptela CLI
admin connected from 127.0.0.1 using console on vmanage
Available storage devices:
hdb	100GB
1) hdb
Select storage device to use: 1
Would you like to format hdb? (y/n): y
Once this is done the VM will reboot. Login again and apply the bootstrap configuration.
config
system
 system-ip 1.1.1.1
 site-id 1000
 organization-name "sdwan-testlab"
 vbond 172.16.255.2
!
vpn 0
 no interface eth0
 interface eth1
  ip address 172.16.255.1/24
  tunnel-interface
  !
  no shutdown
 !
vpn 512
  interface eth0
  ip dhcp-client
  no shutdown
!
commit and-quit
!
While here, generate the Root CA certificate. First login to the vshell which is a Unix like shell. Login with the vshell command.
vmanage# vshell
vmanage:~$
Generate a Root CA key.
openssl genrsa -out ROOTCA.key 2048

# output

Generating RSA private key, 2048 bit long modulus
..............
..
e is 65537 (0x10001)
Next generate the Root CA certificate. I will generate a certificate with 5 years of validity.
openssl req -x509 -new -nodes -key ROOTCA.key -sha256 -days 2000 \
    -subj "/C=AU/ST=NSW/L=NSW/O=sdwan-testlab/CN=vmanage.lab" \
    -out ROOTCA.pem
This will create a Root CA cert named ROOTCA.pem cat the file contents so you can copy and paste them in an upcoming step.
exit back to the cli shell and find the IP address of the vpn512 interface.
vmanage# show int | tab
# output
IF IF IF TCP
AF ADMIN OPER TRACKER ENCAP SPEED MSS RX TX
VPN INTERFACE TYPE IP ADDRESS STATUS STATUS STATUS TYPE PORT TYPE MTU HWADDR MBPS DUPLEX ADJUST UPTIME PACKETS PACKETS
------------------------------------------------------------------------------------------------------------------------------------------------------------------
0 eth1 ipv4 172.16.255.1/24 Up Up - null transport - 52:54:00:fe:62:b7 - - - 0:00:14:33 701 185
0 system ipv4 1.1.1.1/32 Up Up - null loopback - - - - - 0:00:18:20 0 0
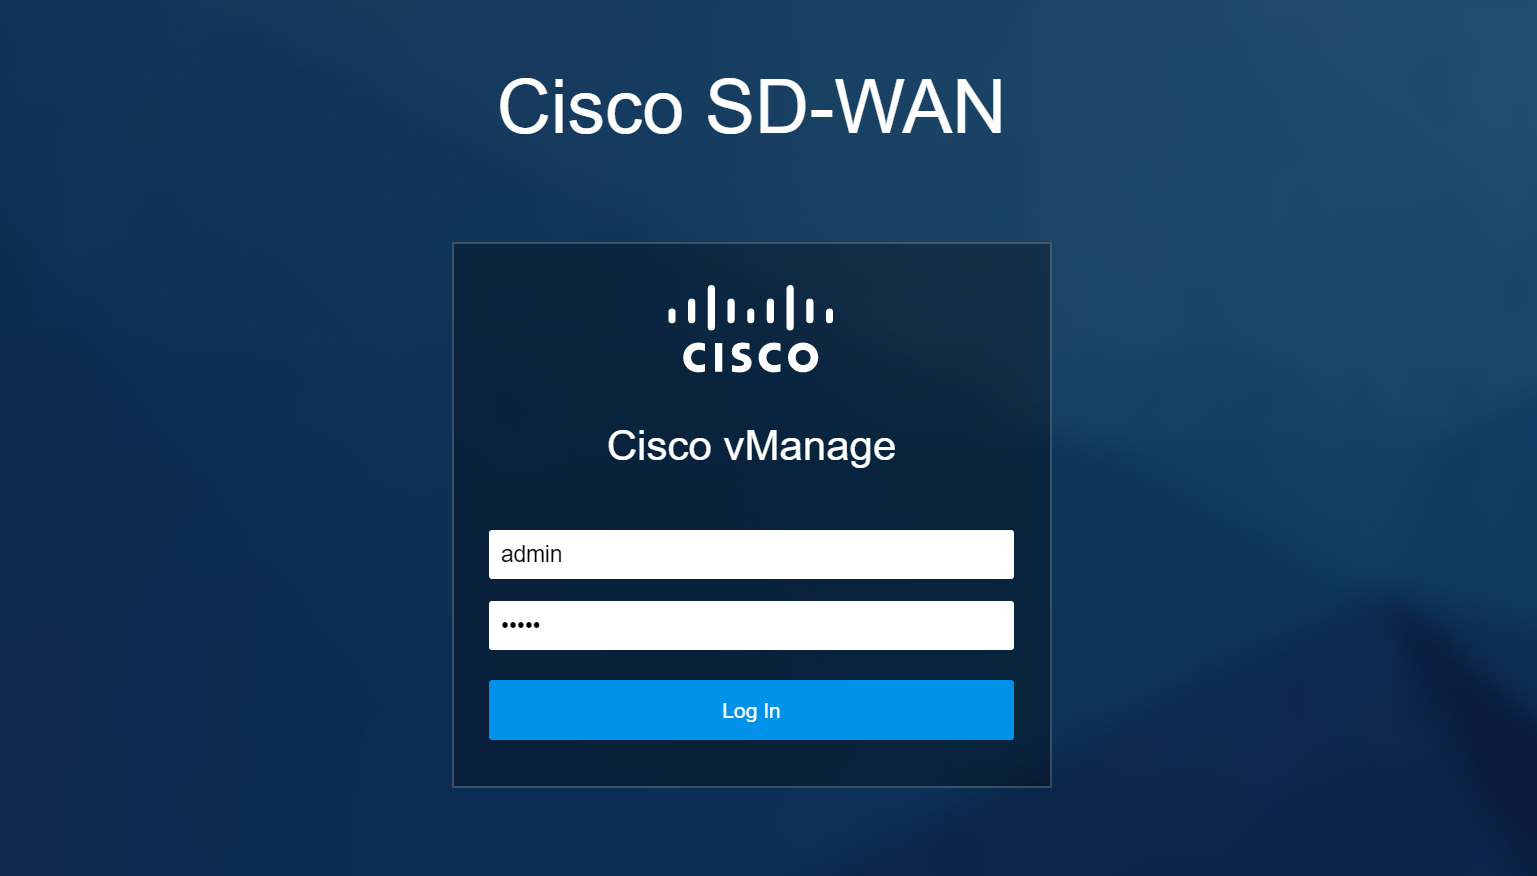
512 eth0 ipv4 192.168.122.129/24 Up Up - null mgmt - 52:54:00:ea:c0:fc - - - 0:00:00:07 862 155Once you have the IP address browse to the URL https://<ip-address> and login with the username/password admin .
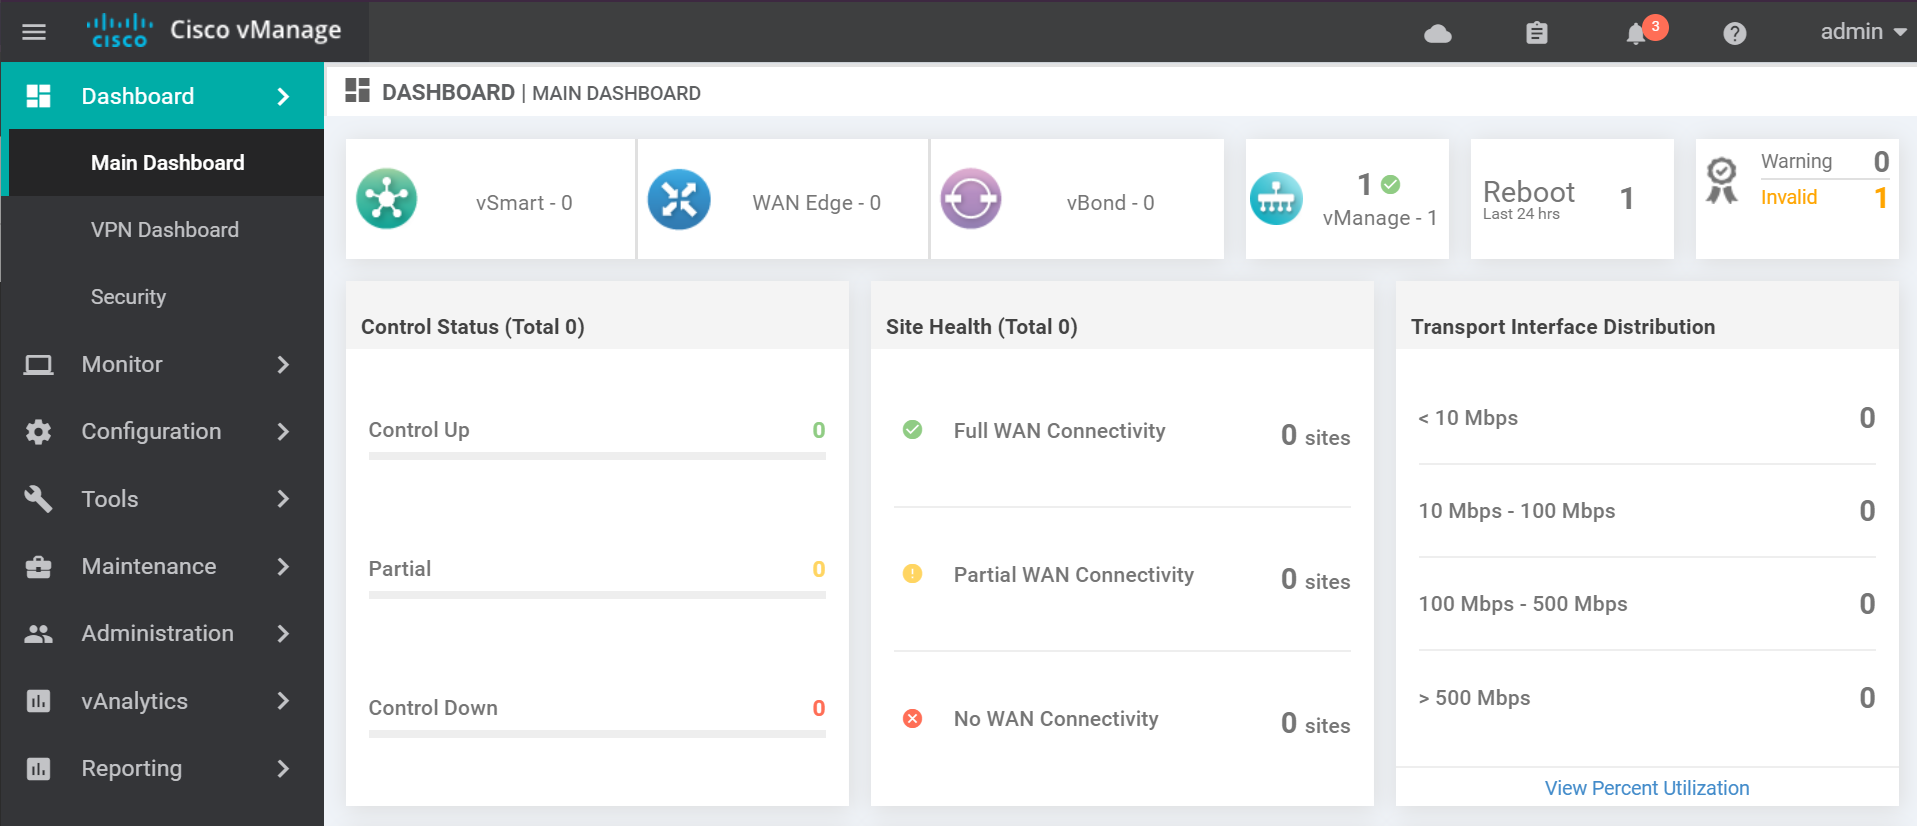
The dashboard looks like this.
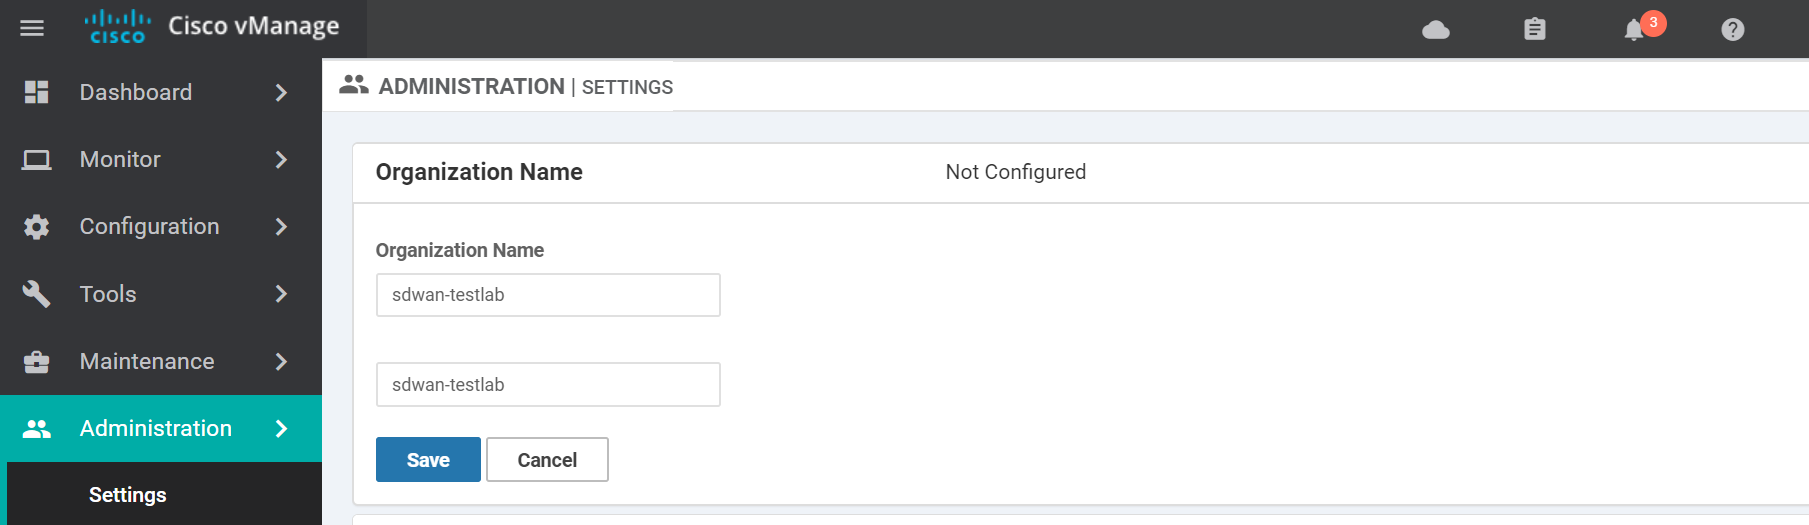
Once logged in navigate to the settings page.
Enter the Organization Name and click Save. This field must match what you used when creating the vBond profile.
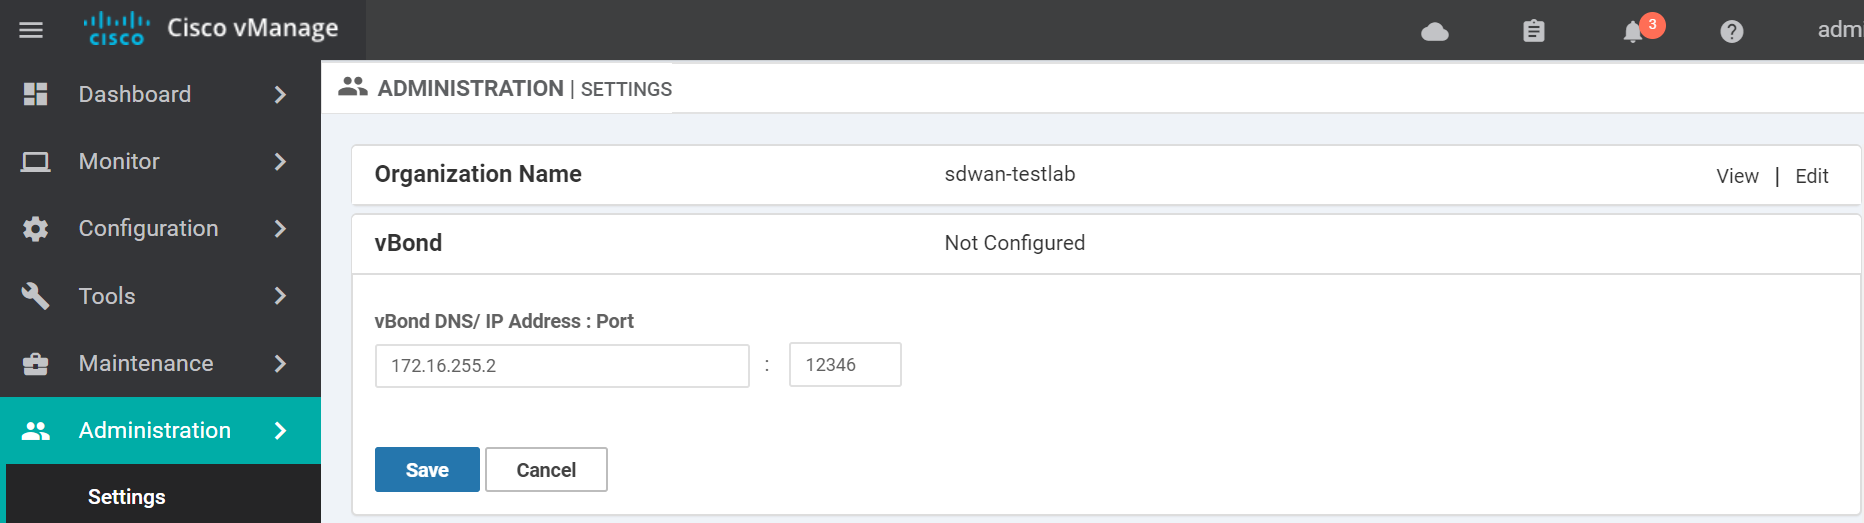
Enter the vBond IP Address and click Save.
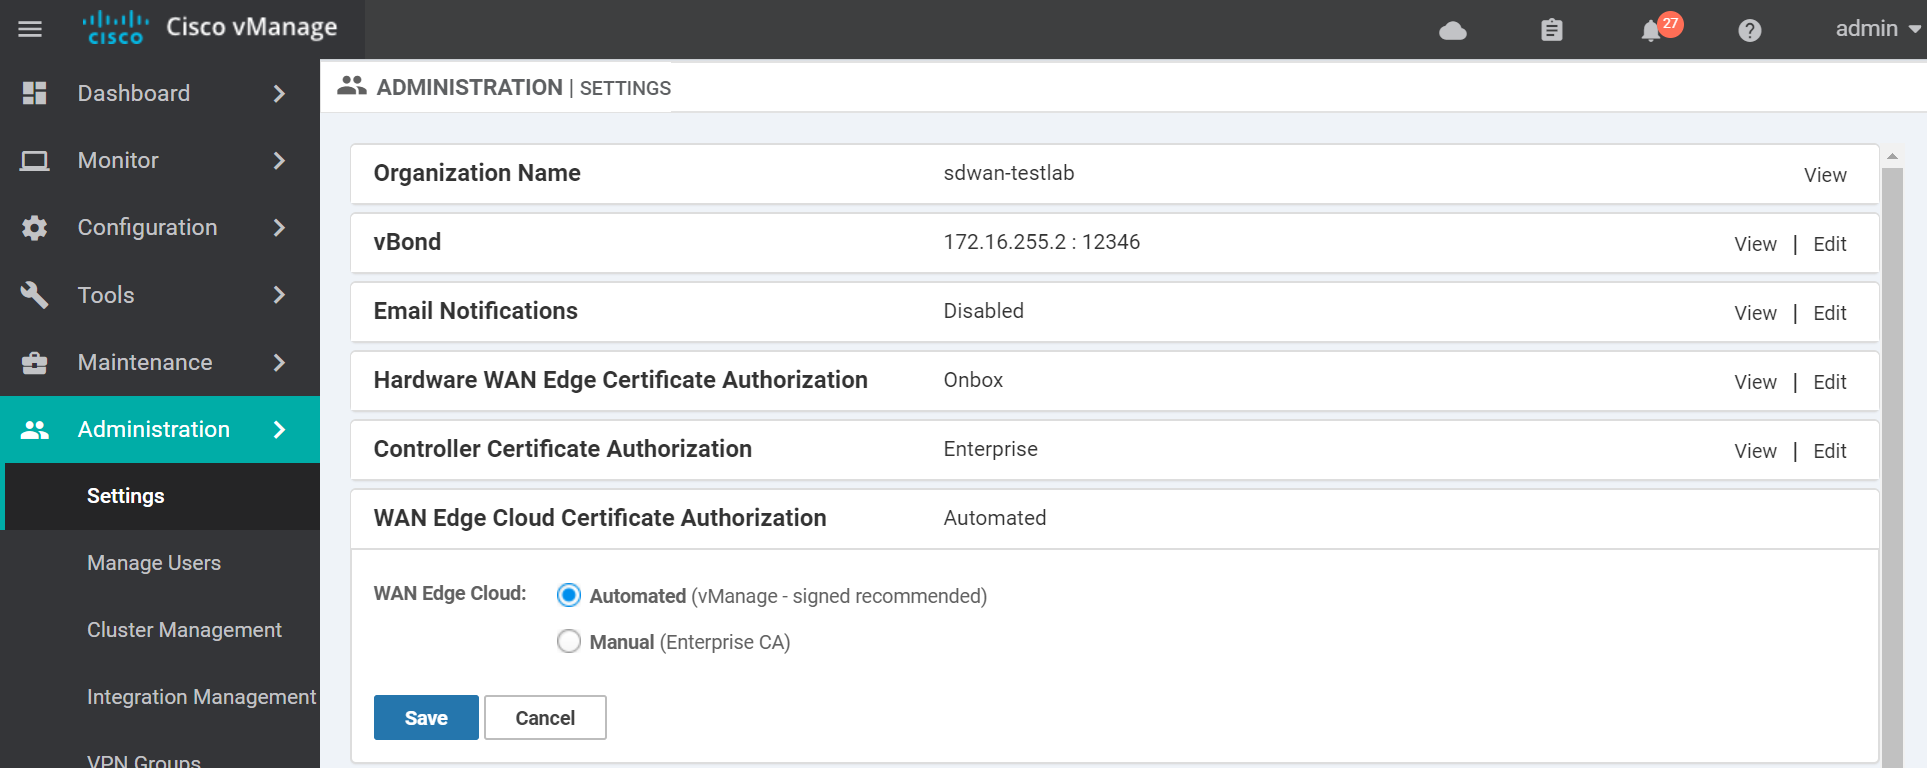
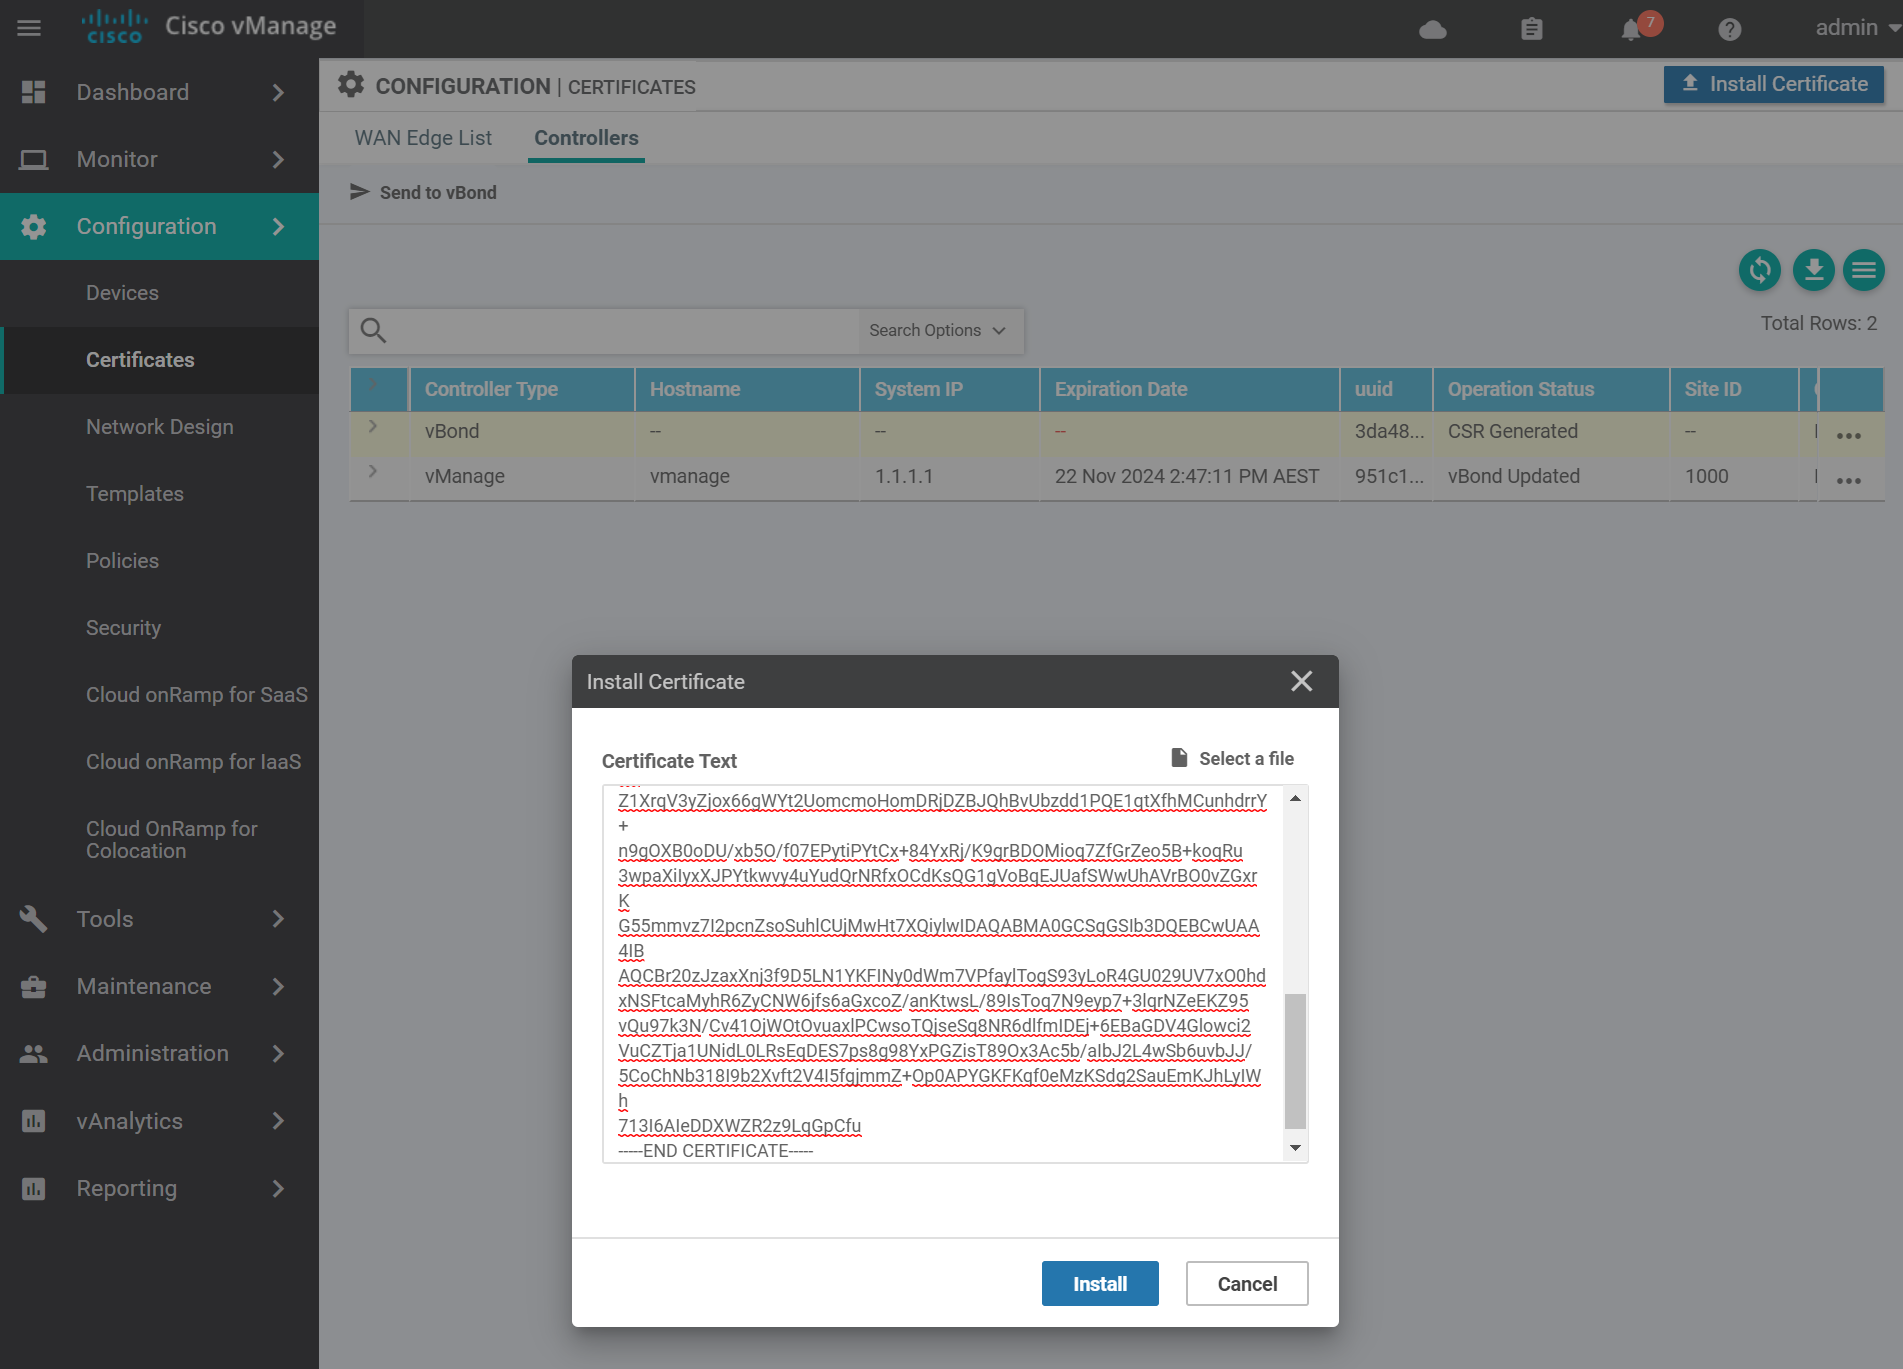
Change the Controller Certificate Authorization to use Enterprise Root Certificate. Paste in the contents of the generated ROOTCA.pem file from the previous step and click Import & Save.
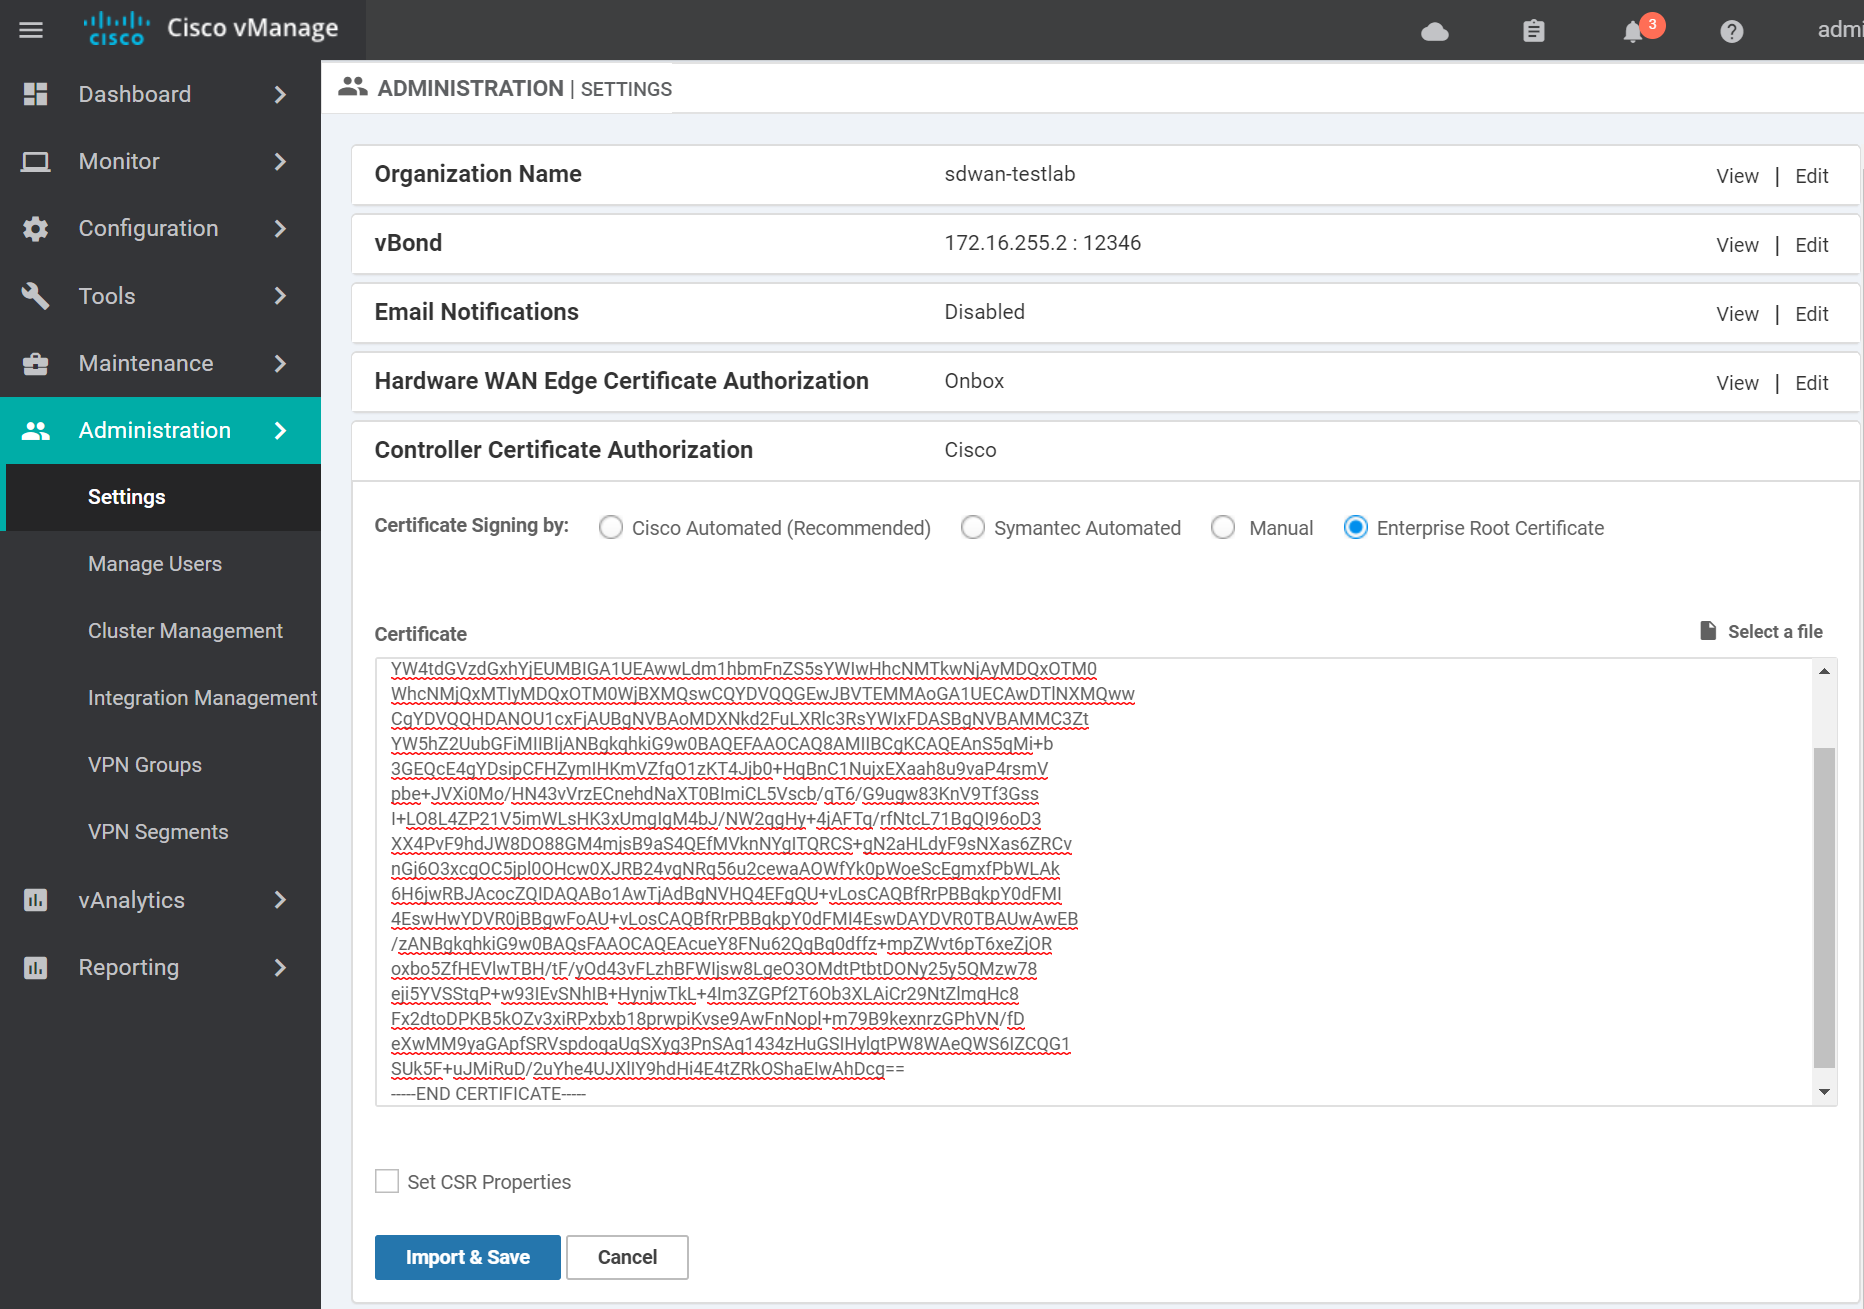
Keep the WAN Edge Cloud Certificate Authorization method as Automated (vManage - signed Certificate). This way the vManage will automatically signed the cloud edge certs when they connect to the vManage.
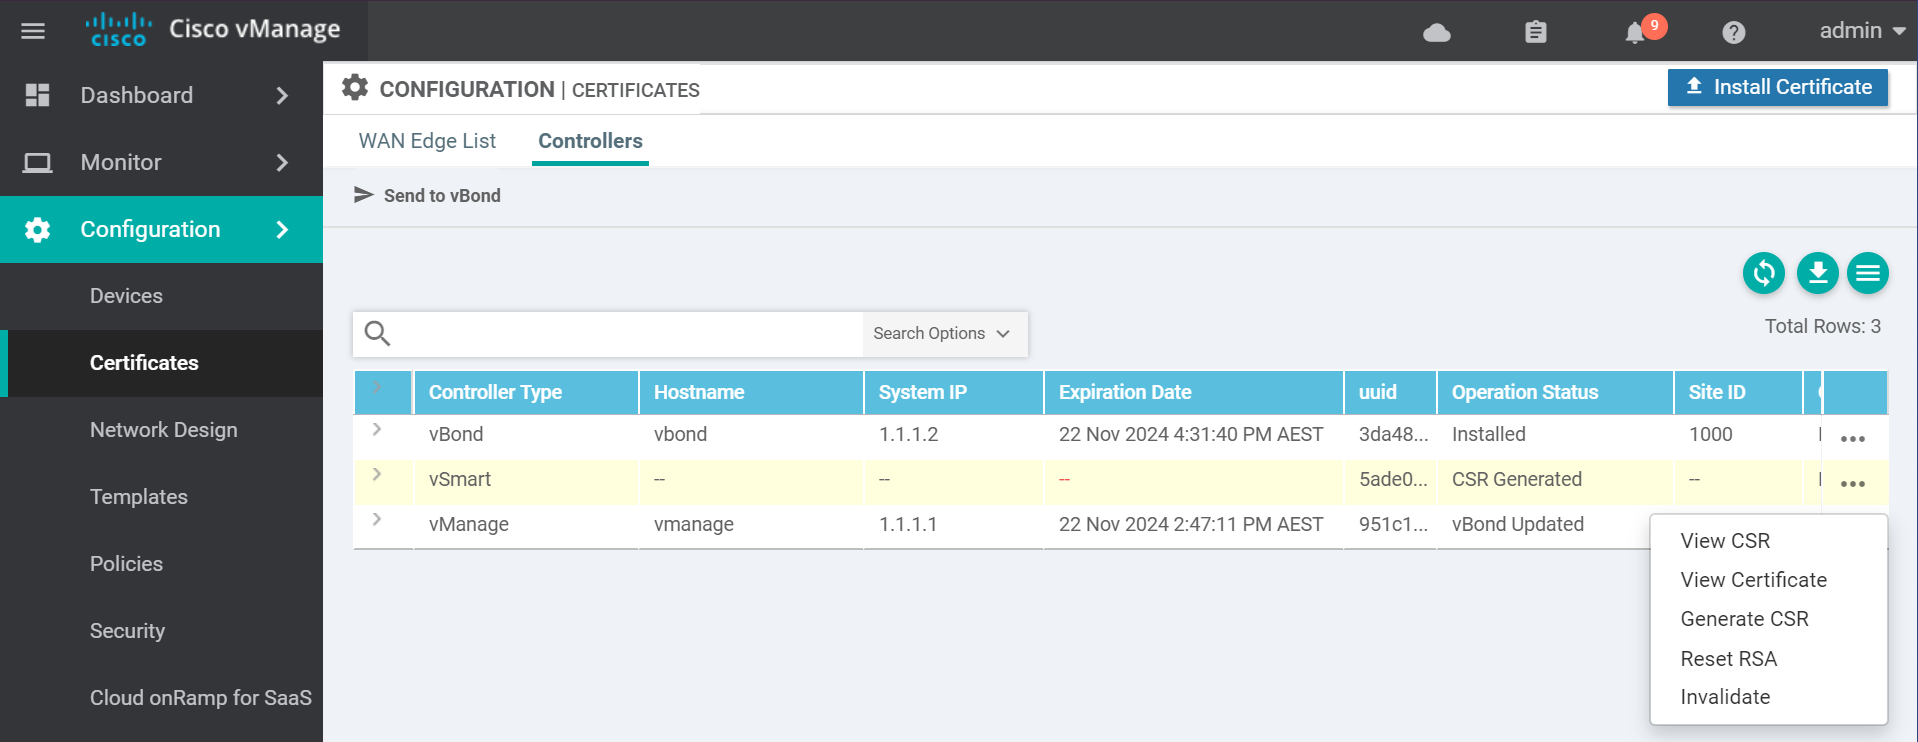
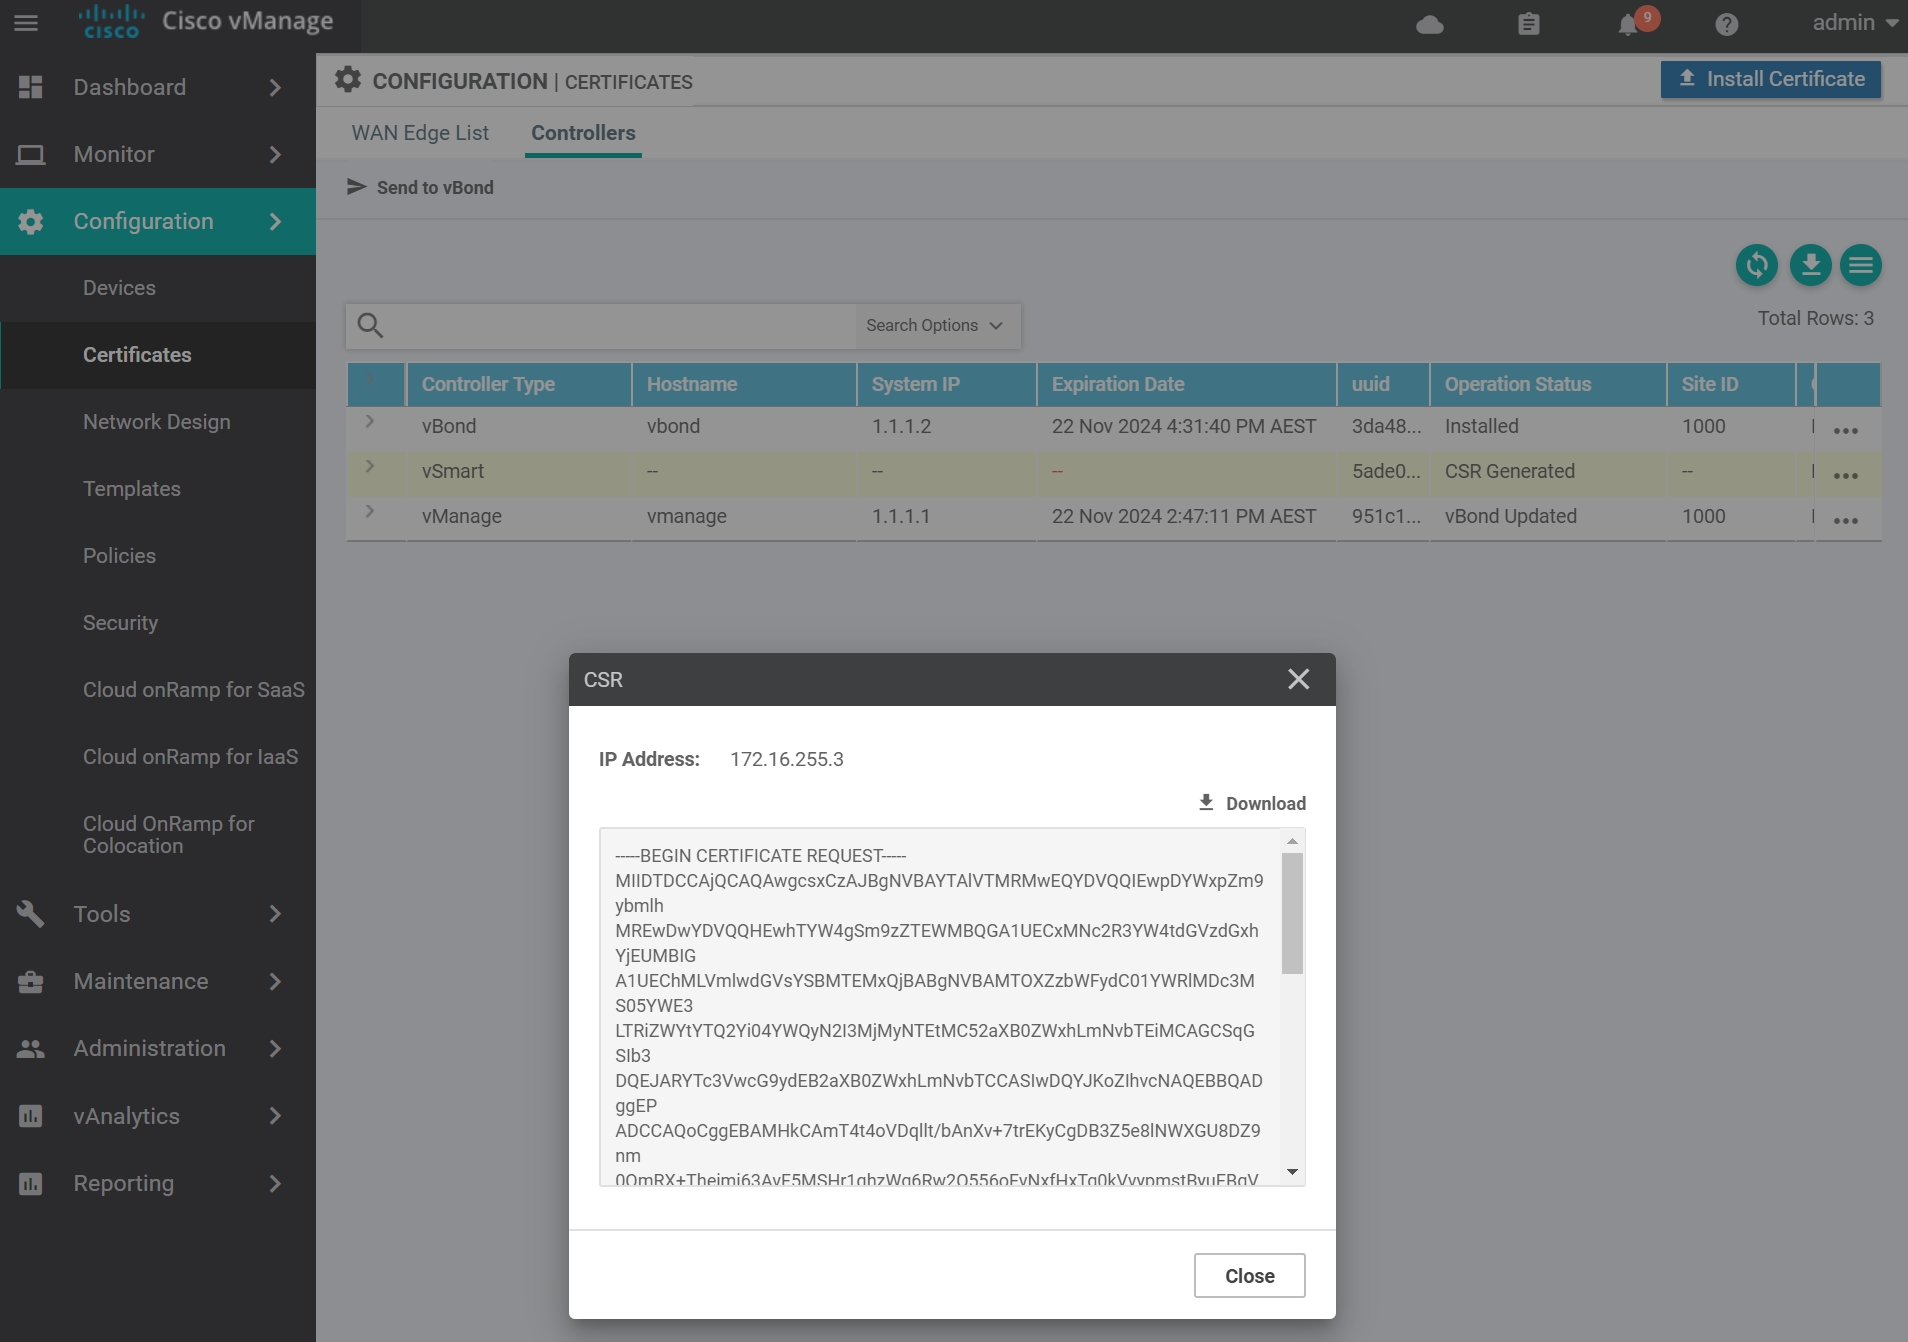
Next we need to create a CSR for the vManage. Navigate to the certificates section.
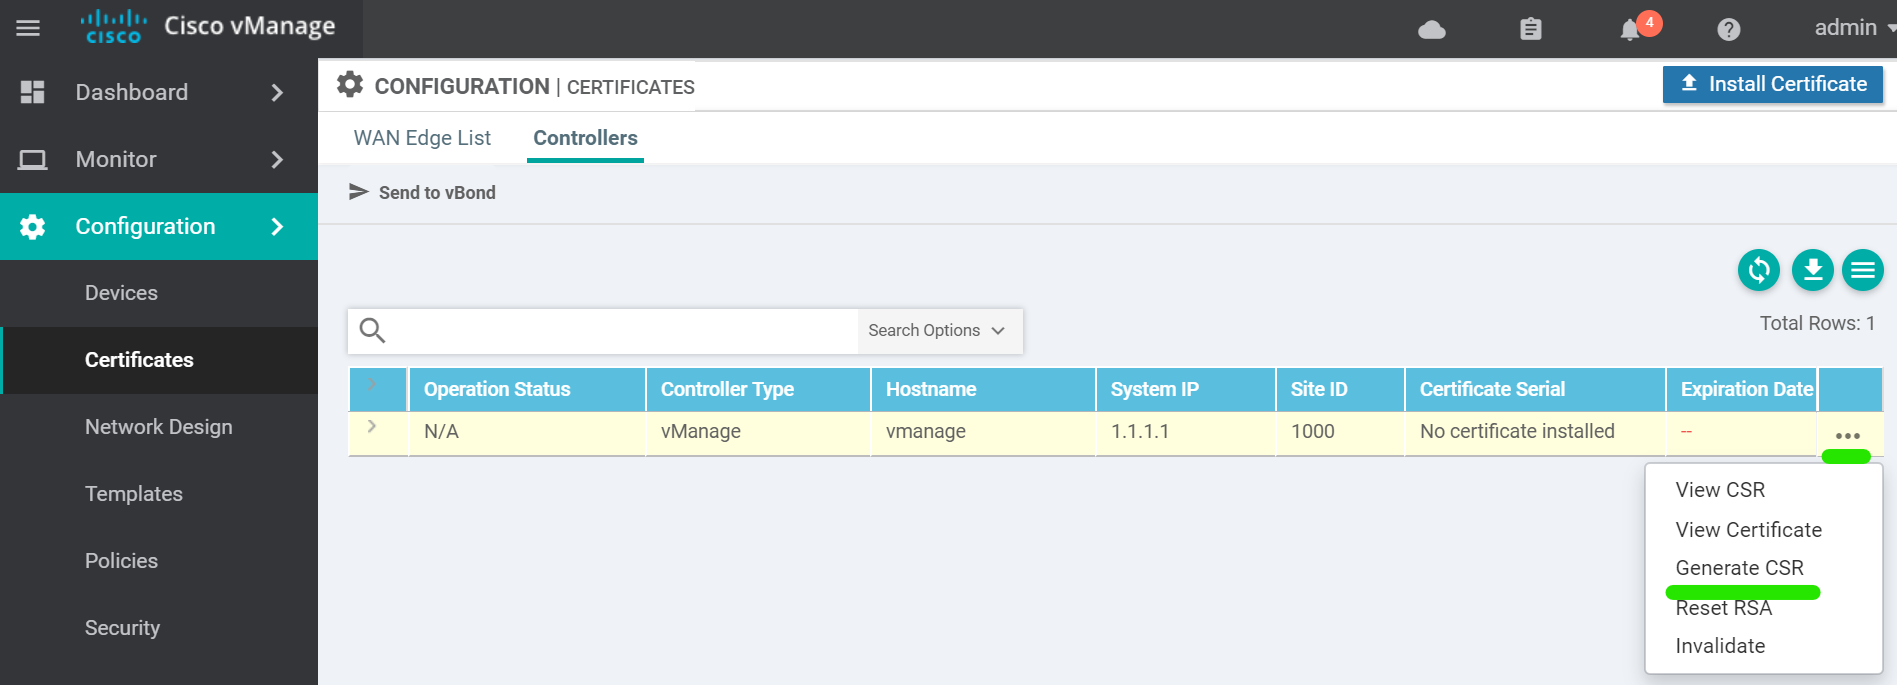
A window will popup with the CSR text. This can be ignored for the vManage.
Back in the vshell there will be a file called vmanage_csr . Sign this file with the ROOTCA.key and ROOTCA.pem .
openssl x509 -req -in vmanage_csr \
-CA ROOTCA.pem -CAkey ROOTCA.key -CAcreateserial \
-out vmanage.crt -days 2000 -sha256
# output
Signature ok
subject=/C=US/ST=California/L=San Jose/OU=sdwan-testlab/O=Viptela LLC/CN=vmanage-951c1251-07b2-4a4e-984c-4e1dea25a4f1-0.viptela.com/emailAddress=support@viptela.com
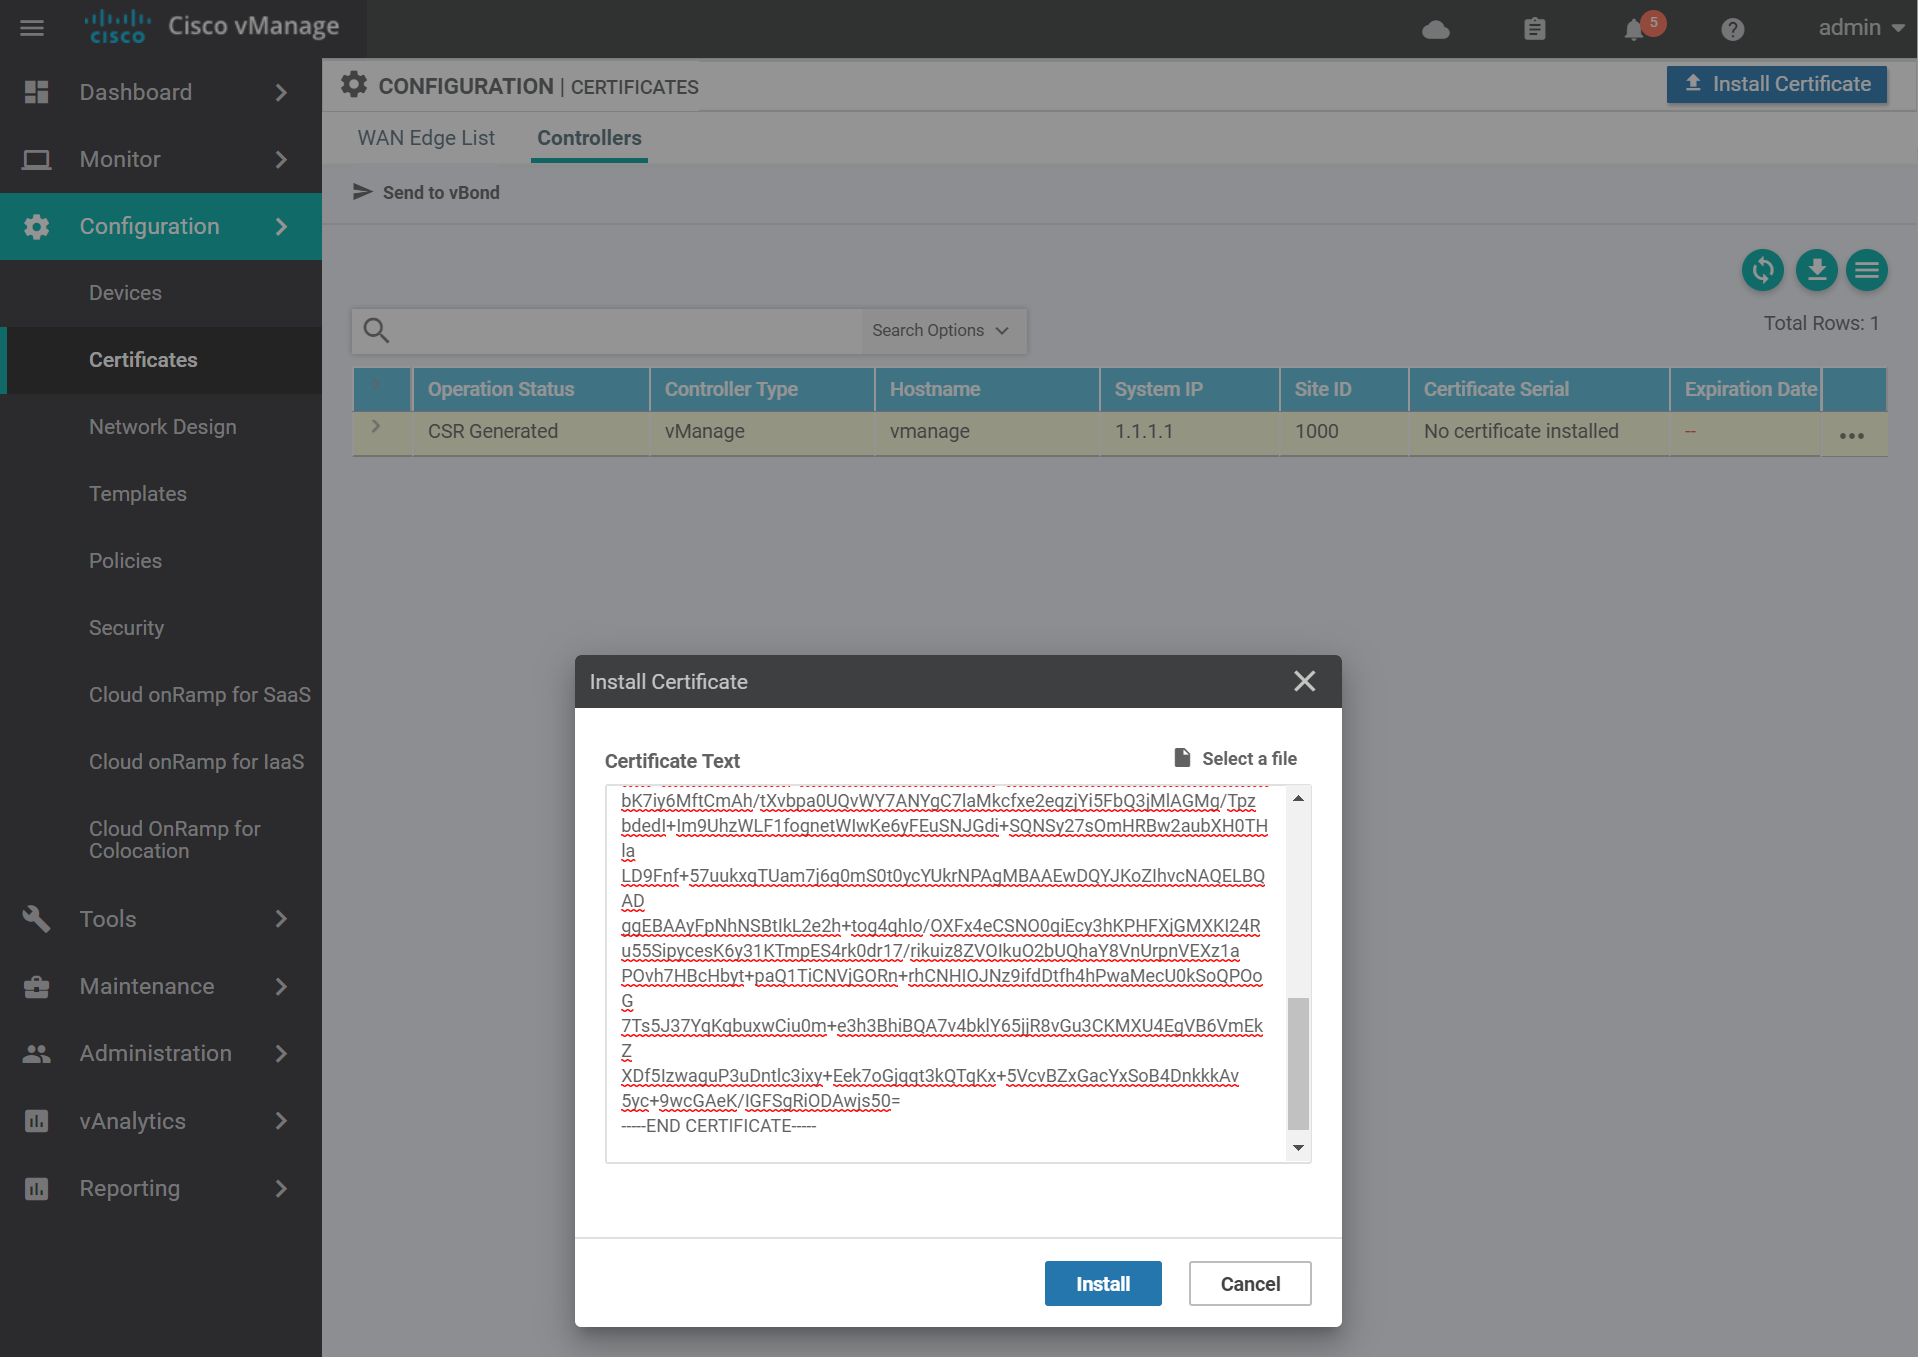
Getting CA Private KeyThis creates a file called vmanage.crt cat the file in order to copy and paste it into the web interface in the next step.
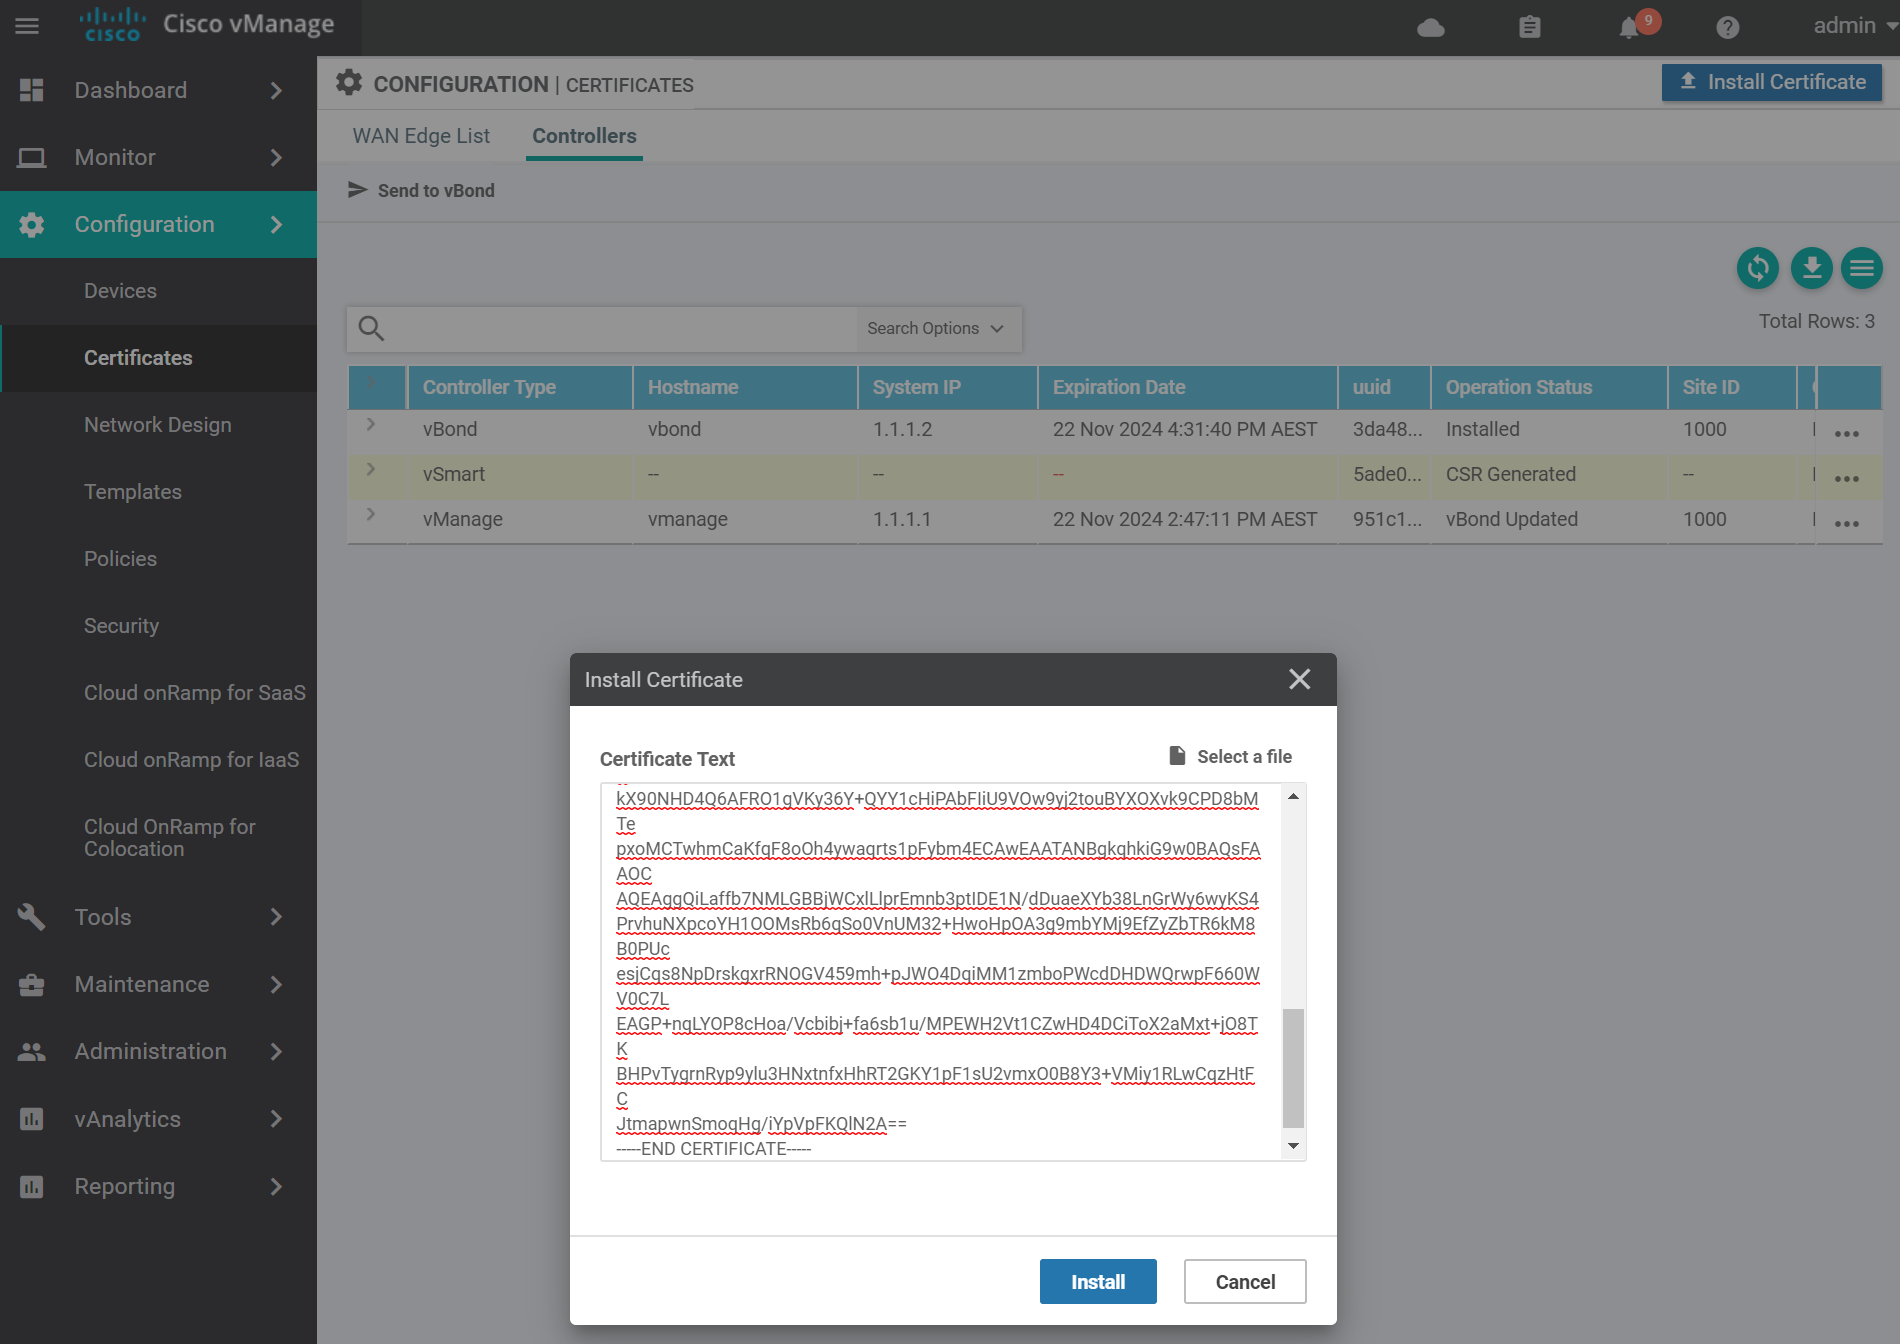
Navigate to the certificates page and install the certificate by pasting the contents of the vmanage.crt file and click Install.
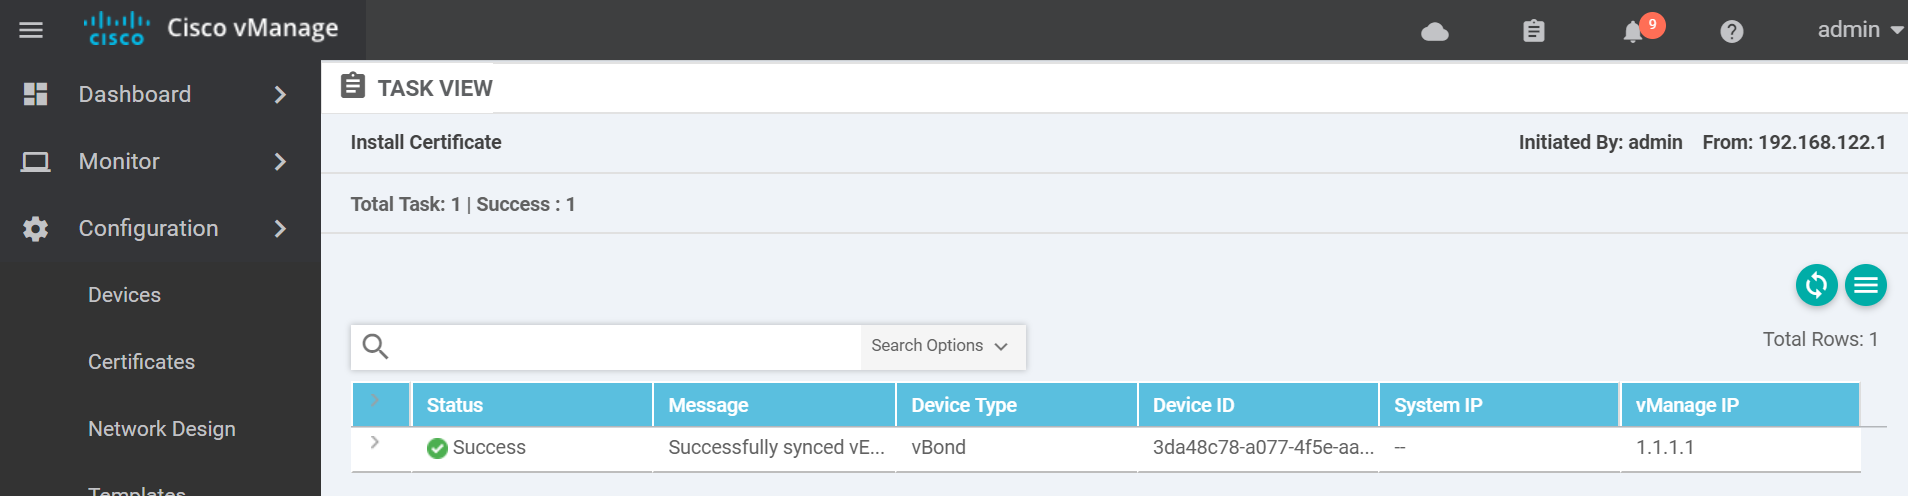
You should see a success message similar to the below.

To exit the console use one of these key combinations (Assuming English keyboard).
- CTRL + ]
- CTRL + 5
- Press and hold CTRL and SHIFT while pressing 6 then ]
For convenience sake, I recommend SSHing to the vManage from another terminal in order to sign the cert of the other devices.
vBond
Start the install of the vBond VM.
virt-install \
    --name vbond \
    --os-type linux \
    --os-variant ubuntu14.04 \
    --cpu host \
    --vcpus=2 \
    --hvm \
    --arch=x86_64 \
    --ram 2048 \
    --disk path=viptela-bond-19.1.0-genericx86-64.qcow2,size=16,device=disk,bus=ide,format=qcow2 \
    --network=network:default,model=virtio \
    --network=network:default,model=virtio \
    --graphics none \
    --import
Once you see the message System Ready login with the username/password admin and apply the following bootstrap config.
config
system
 host-name vbond
 system-ip 1.1.1.2
 site-id 1000
 organization-name "sdwan-testlab"
 vbond 172.16.255.2 local vbond-only
!
vpn 0
 interface ge0/0
  no tunnel-interface
  ip address 172.16.255.2/24
  no shutdown
 !
!
vpn 512
 interface eth0
  ip dhcp-client
  no shutdown
 !
commit and-quit
!
Navigate to the devices page to add the vBond to the vManage.
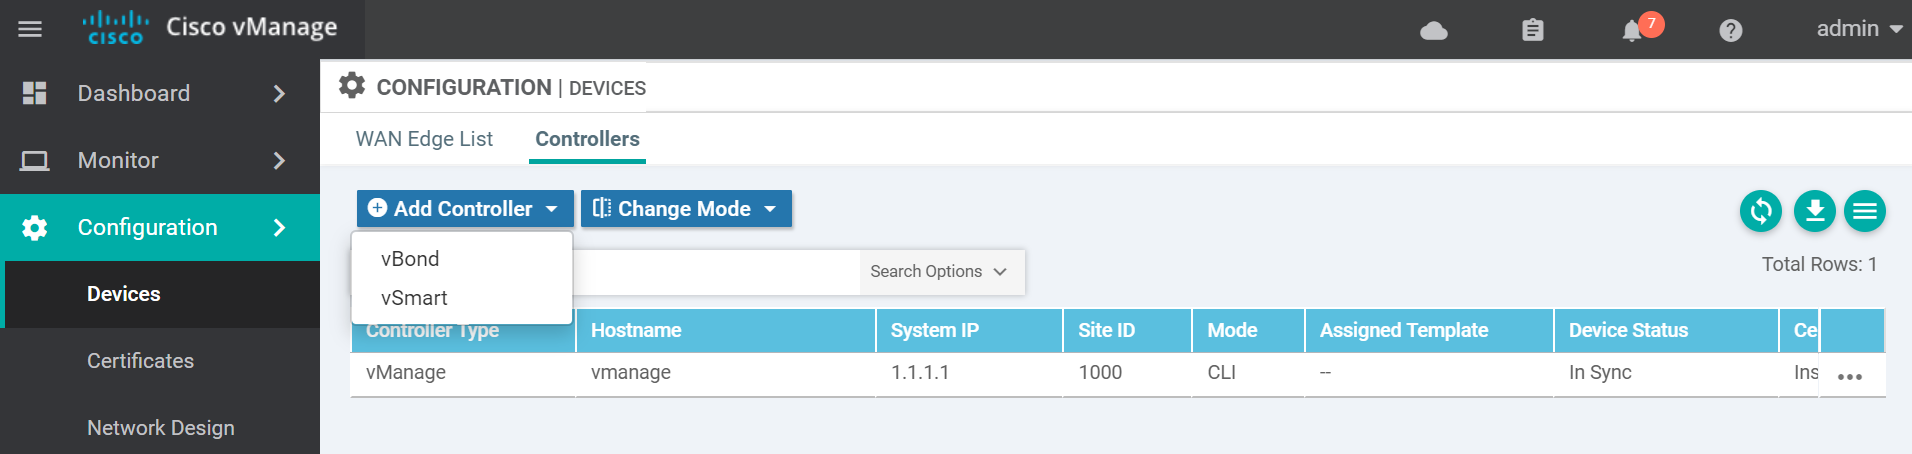
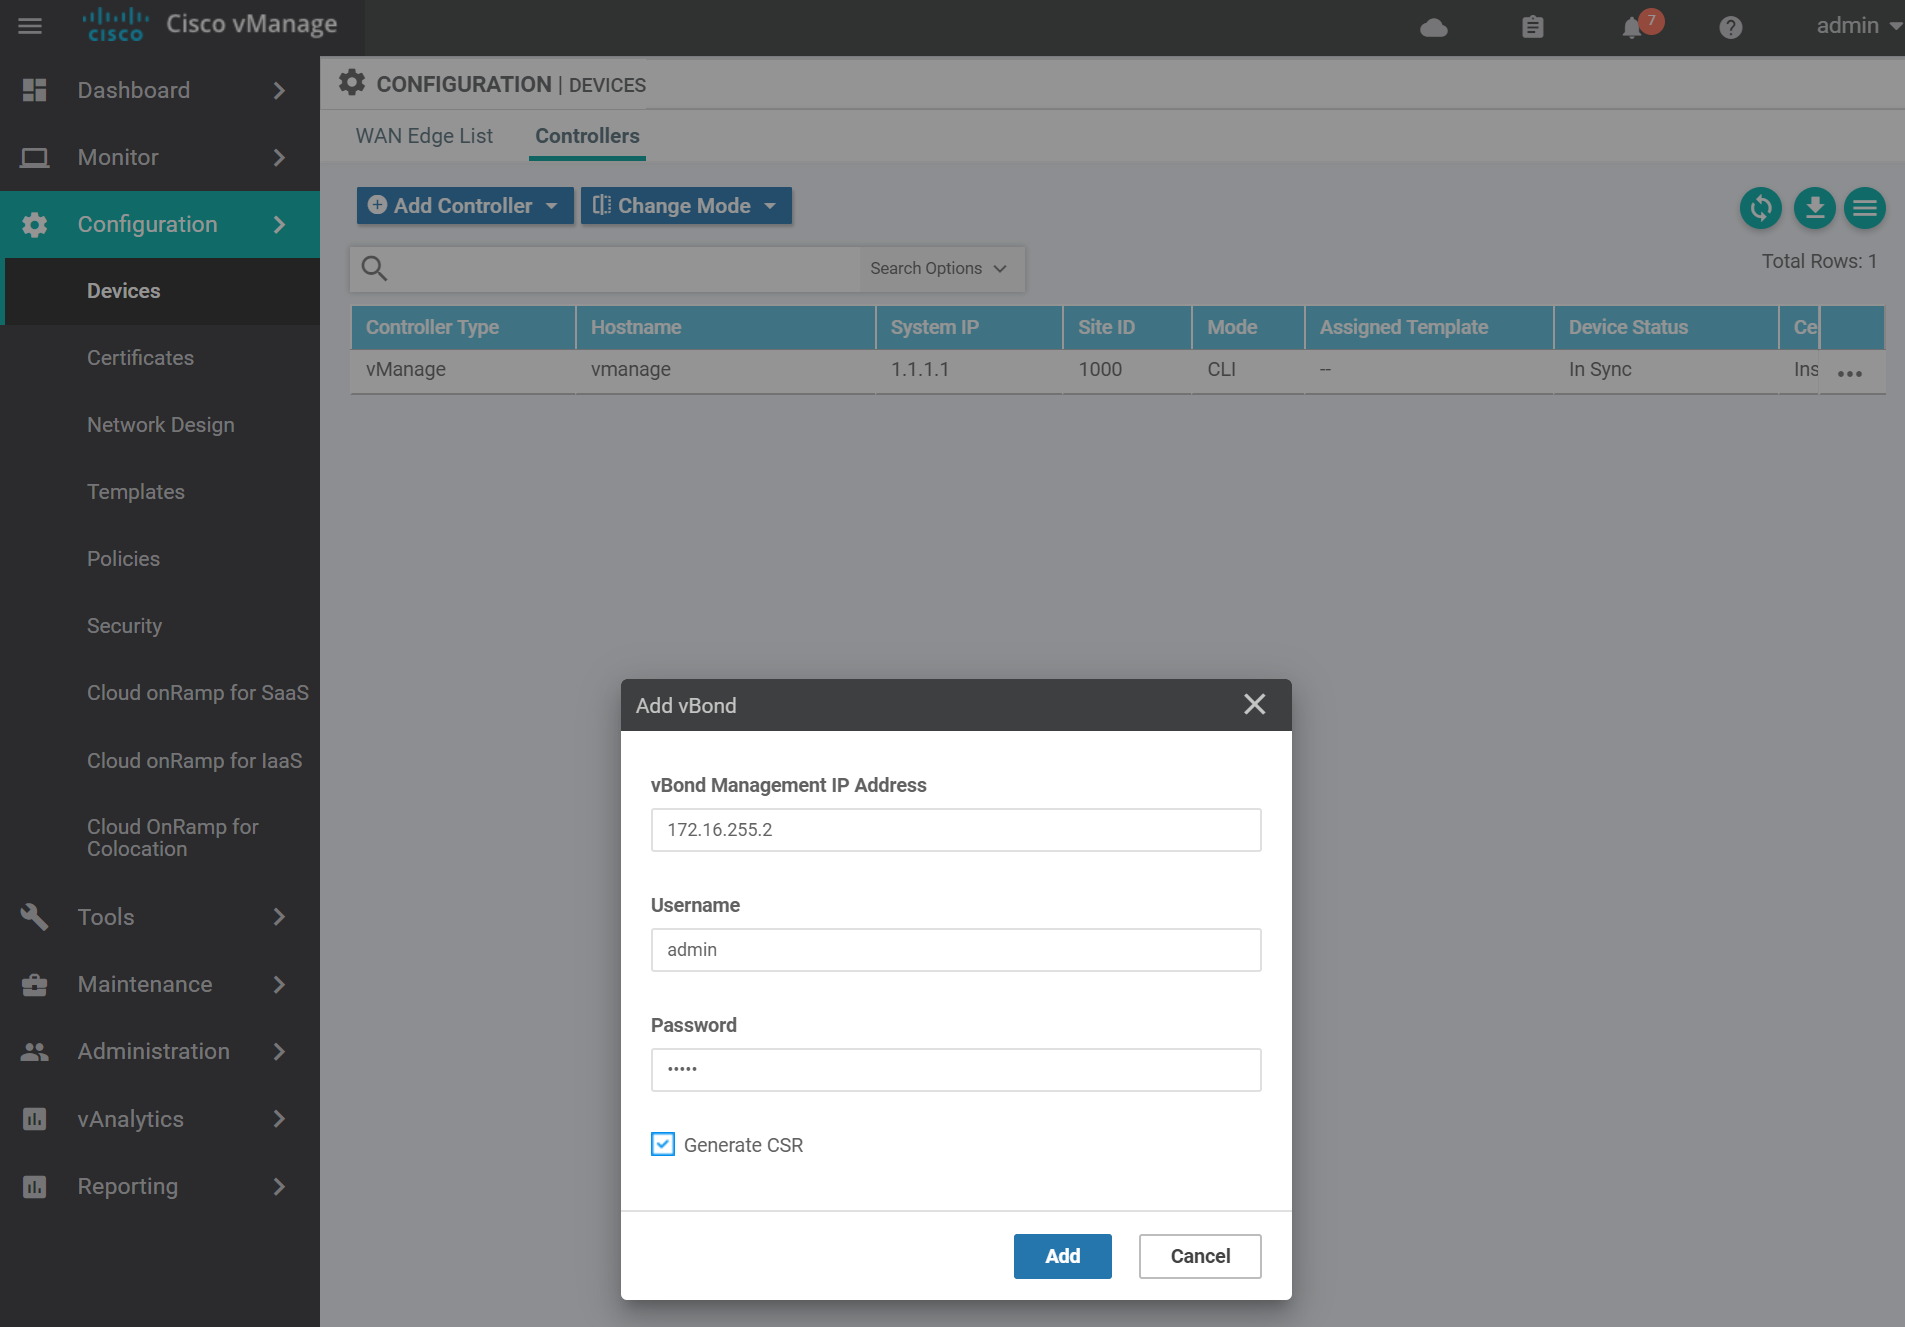
Enter the vBond details add click Add.
Navigate to the certificates page to get the vBond CSR text.
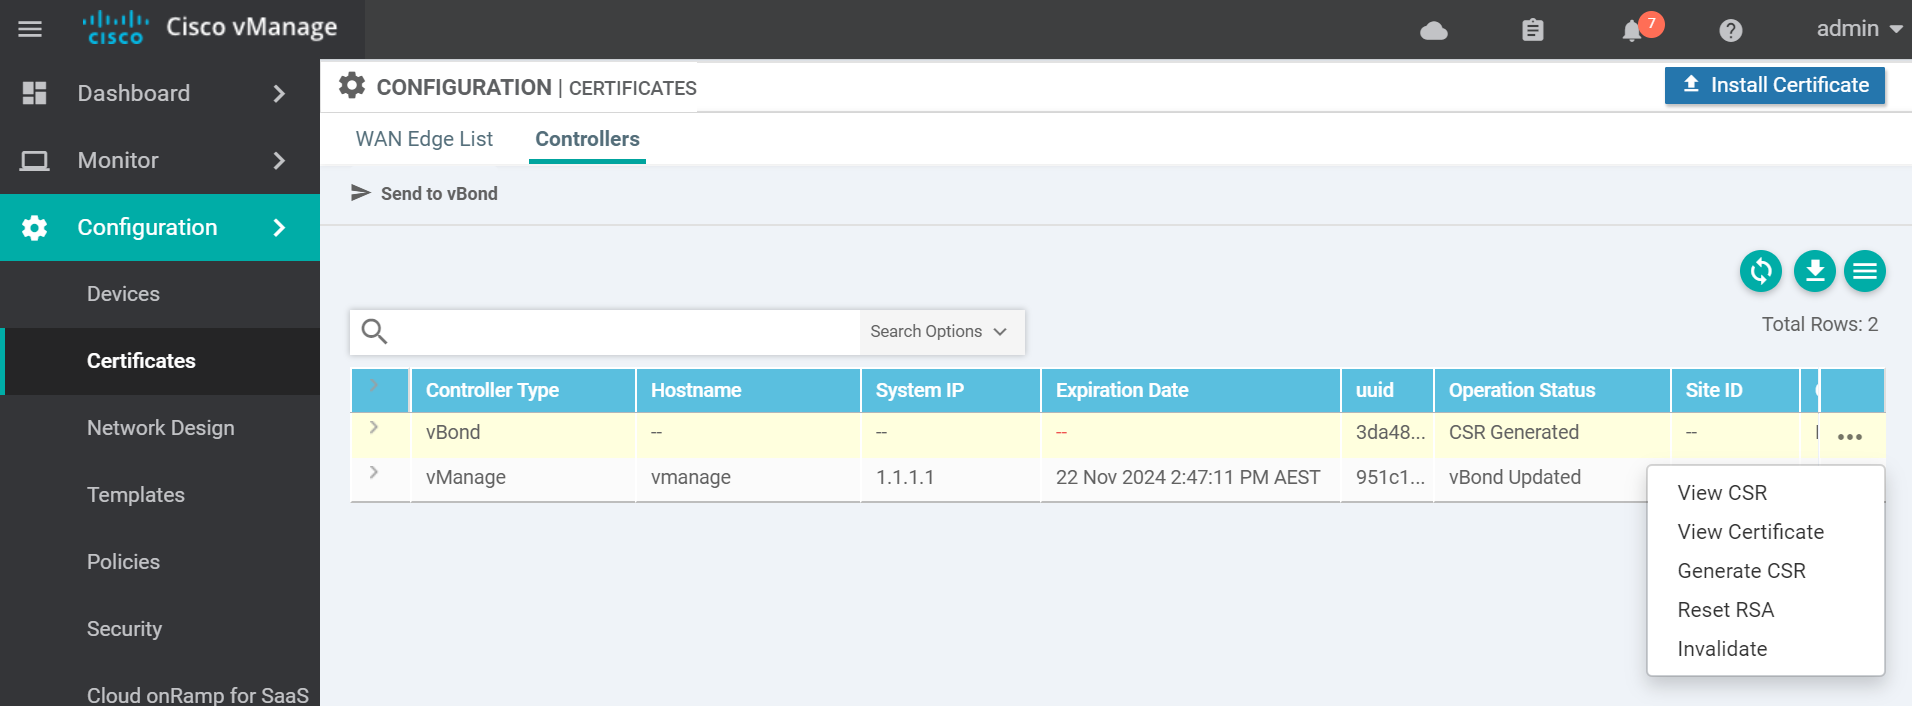
Copy the CSR text and go to the vManage vshell to generate the certificate.
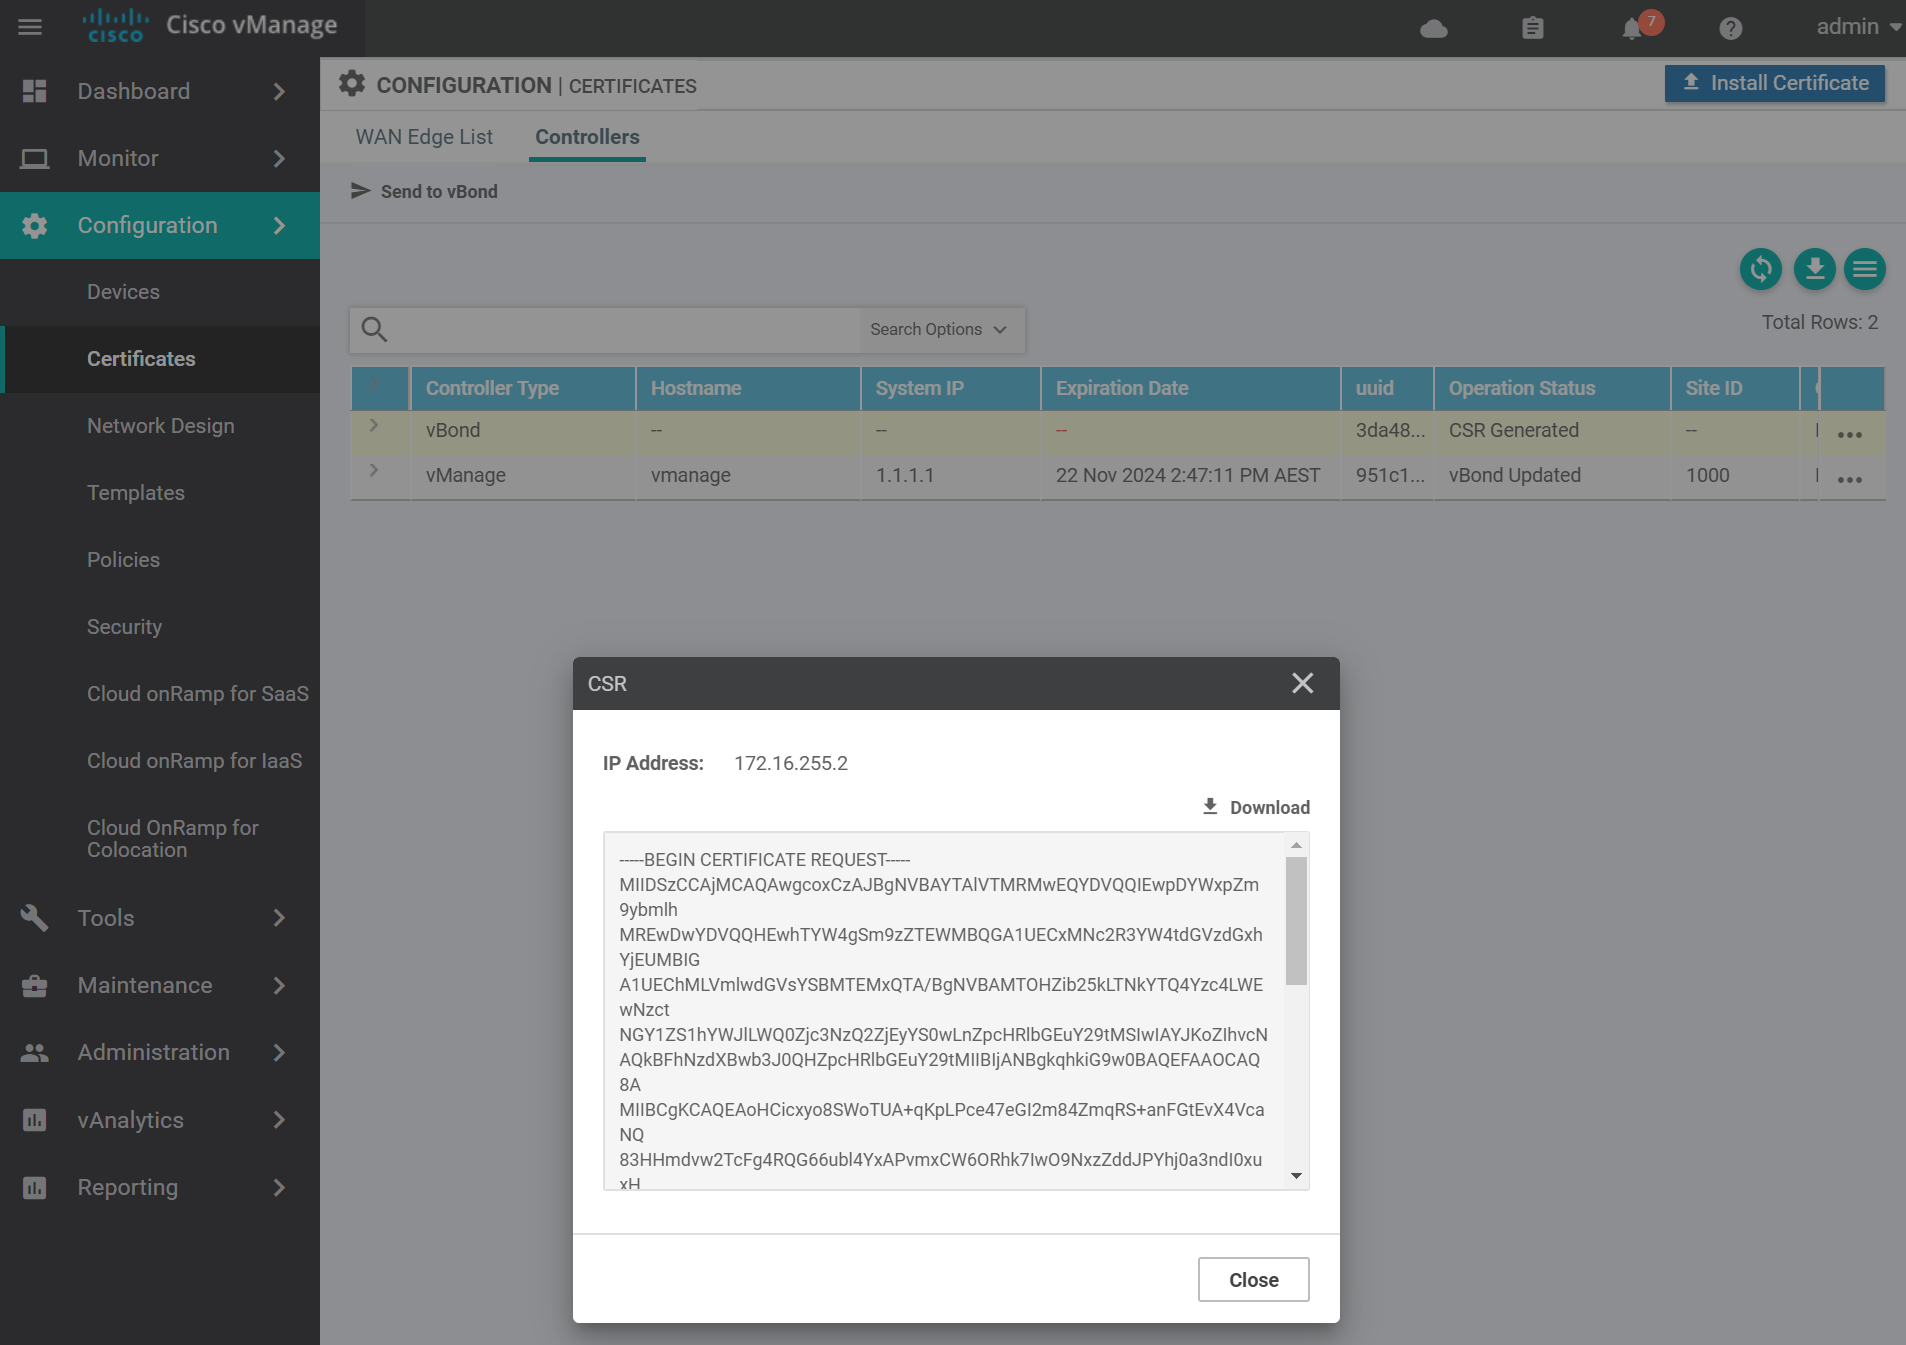
Use vim to create a file called vbond.csr with the contents of the vBond CSR from the previous step. Then sign the CSR with the Root CA certificate.
openssl x509 -req -in vbond.csr \
    -CA ROOTCA.pem -CAkey ROOTCA.key -CAcreateserial \
    -out vbond.crt -days 2000 -sha256

# output

Signature ok
subject=/C=US/ST=California/L=San Jose/OU=sdwan-testlab/O=Viptela LLC/CN=vbond-3da48c78-a077-4f5e-aabe-d4f77746f12a-0.viptela.com/emailAddress=support@viptela.com
Getting CA Private Key
This will create a certificate file called vbond.crt . cat the contents of the vbond.crt file in order to copy and past the contents to the vManage in the next step.
Navigate to the certificates page and install the vBond certificate by pasting in the contents of the vbond.crt file and click Install.
If it was successful you will see a success message similar to the below.
Finally activate the control plane tunnel on the ge0/0 interface.
config
vpn 0
 interface ge0/0
  tunnel-interface
   encapsulation ipsec
  !
  no shutdown
 !
!
commit and-quit
!
Confirm that control connections are active between the vBond and vManage.
show orchestrator connections

# output
                                                  PEER                      PEER
         PEER     PEER     PEER             SITE        DOMAIN      PEER             PRIVATE  PEER             PUBLIC                                   ORGANIZATION
INSTANCE TYPE     PROTOCOL SYSTEM IP        ID          ID          PRIVATE IP       PORT     PUBLIC IP        PORT    REMOTE COLOR     STATE           NAME                    UPTIME
-----------------------------------------------------------------------------------------------------------------------------------------------------------------------------------------------
0        vmanage  dtls     1.1.1.1          1000        0           172.16.255.1     12346    172.16.255.1     12346   default          up              sdwan-testlab           0:02:19:17
0        vmanage  dtls     1.1.1.1          1000        0           172.16.255.1     12446    172.16.255.1     12446   default          up              sdwan-testlab           0:02:19:17
To exit the console use one of these key combinations (Assuming English keyboard).
- CTRL + ]
- CTRL + 5
- Press and hold CTRL and SHIFT while pressing 6 then ]
vSmart
Start the install of the vSmart VM.
virt-install \
    --name vsmart \
    --os-type linux \
    --os-variant ubuntu14.04 \
    --cpu host \
    --vcpus=2 \
    --hvm \
    --arch=x86_64 \
    --ram 2048 \
    --disk path=viptela-smart-19.1.0-genericx86-64.qcow2,size=16,device=disk,bus=ide,format=qcow2 \
    --network=network:default,model=virtio \
    --network=network:default,model=virtio \
    --graphics none \
    --import
Once you see the message System Ready login with the username/password admin and apply the following bootstrap config.
config
system
system-ip 1.1.1.3
site-id 1000
organization-name "sdwan-testlab"
vbond 172.16.255.2
!
vpn 0
no interface eth0
interface eth1
ip address 172.16.255.3/24
no shutdown
!
!
vpn 512
interface eth0
ip dhcp-client
no shutdown
!
commit and-quit
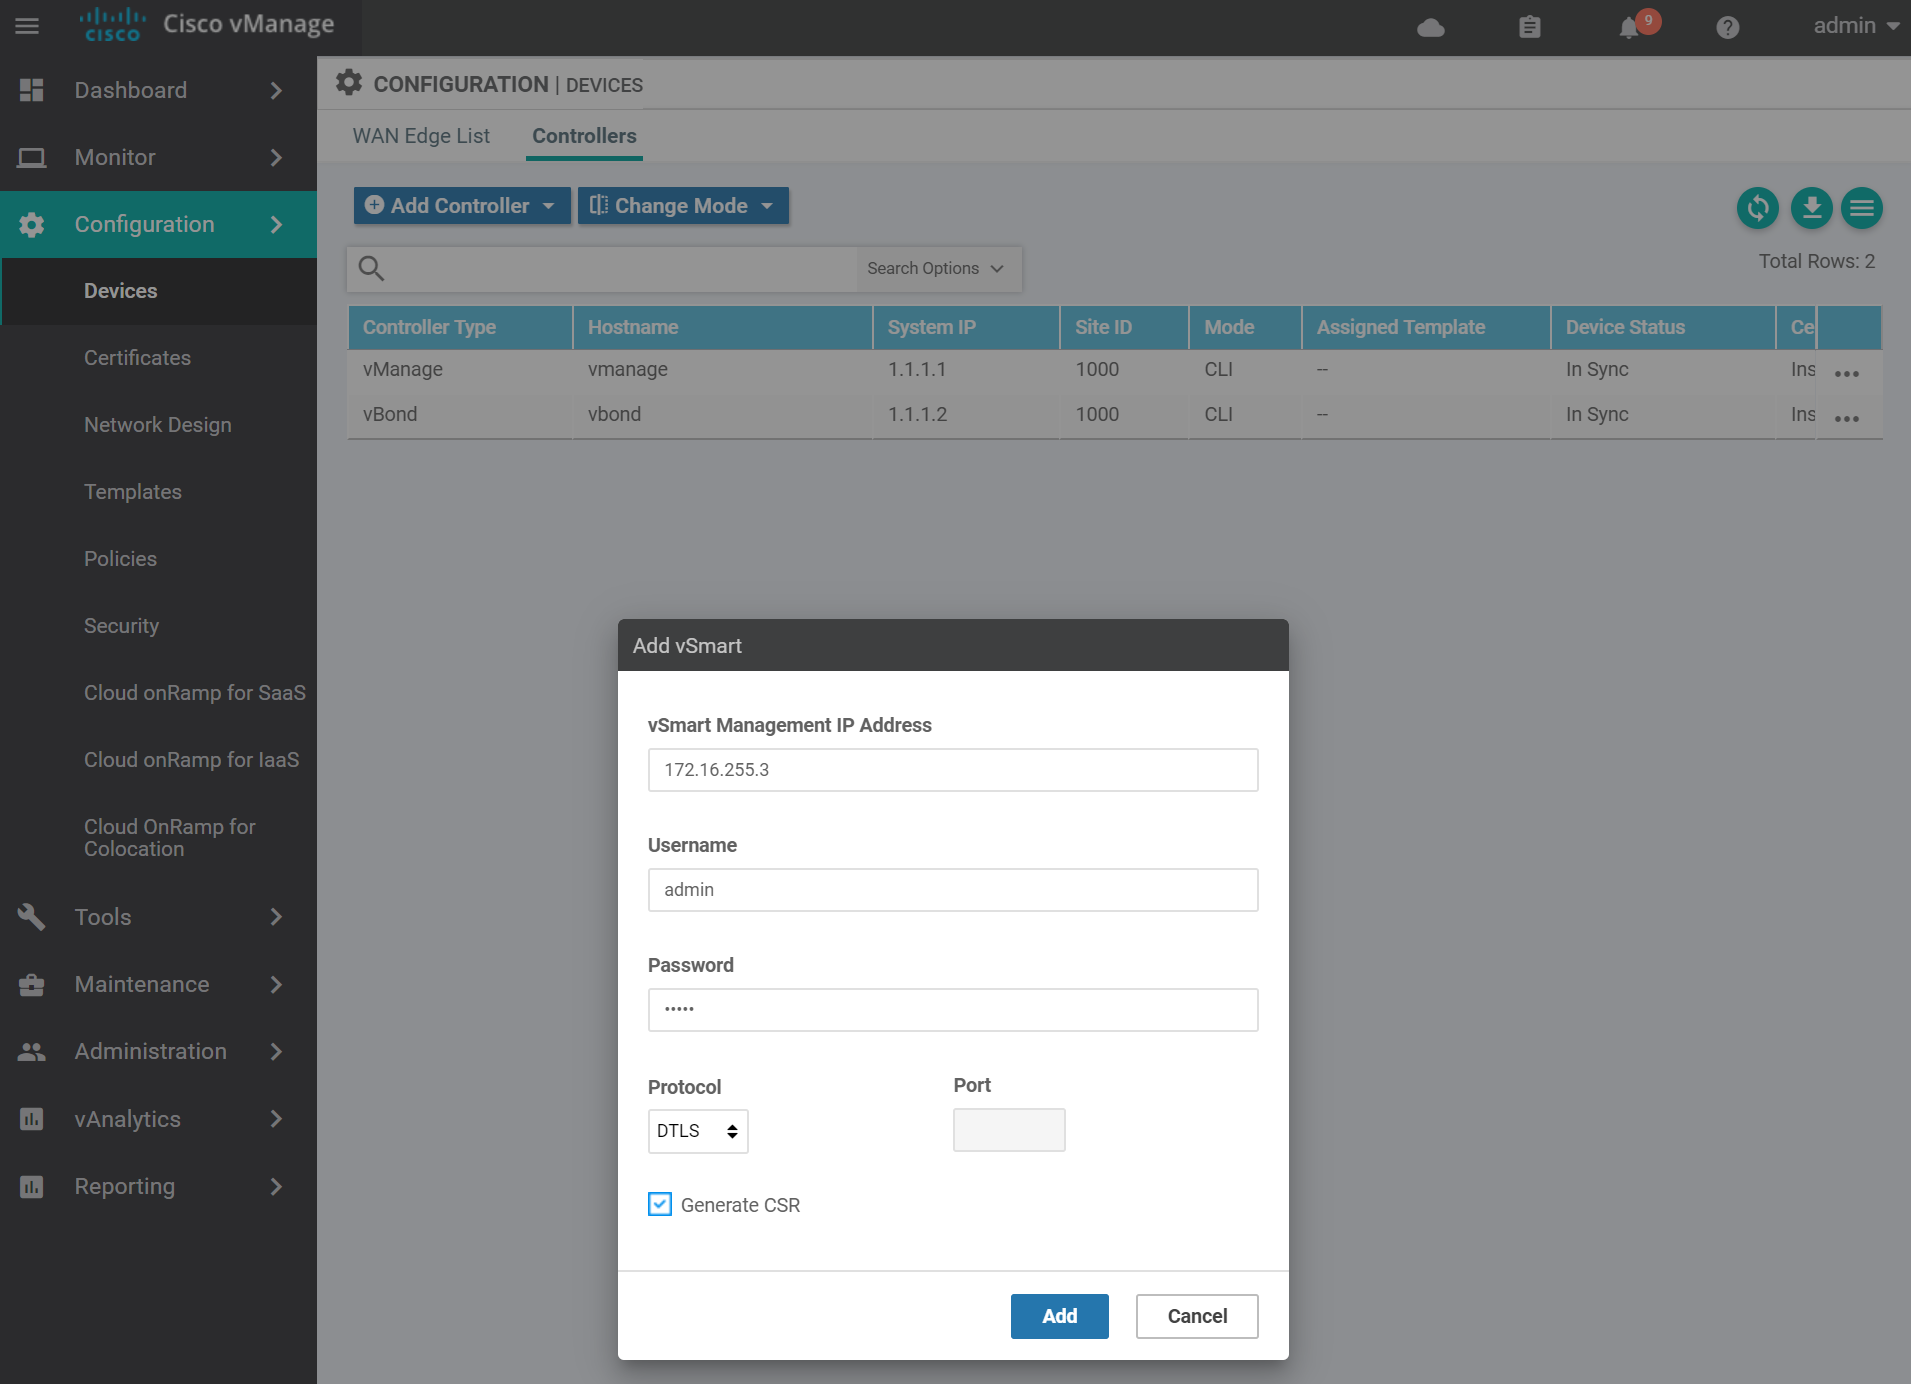
!Navigate to the devices page to add the vSmart to the vManage.
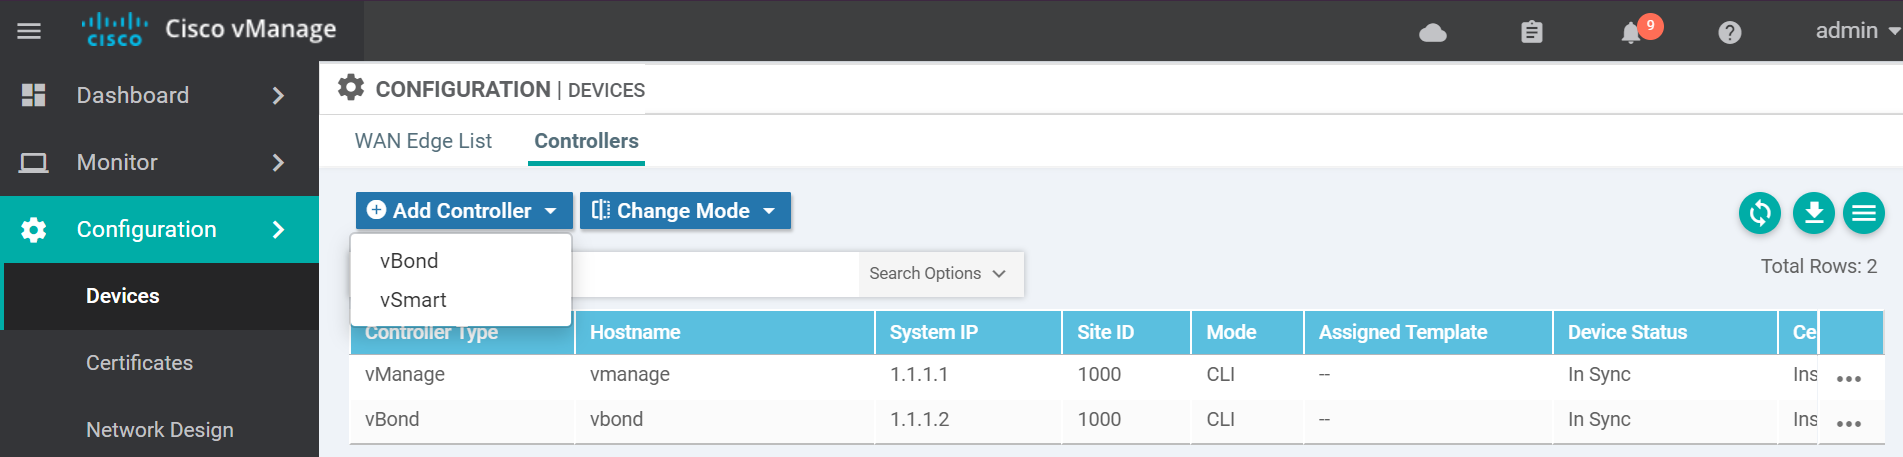
Enter the vSmart details and click Add.
Navigate to the certificates page to get the vSmart CSR text.
Copy the CSR text and go to the vManage vshell to generate the certificate.
Use vim to create a file called vsmart.csr with the contents of the vSmart CSR from the previous step. Then sign the CSR with the Root CA certificate.
openssl x509 -req -in vsmart.csr \
    -CA ROOTCA.pem -CAkey ROOTCA.key -CAcreateserial \
    -out vsmart.crt -days 2000 -sha256

# output

Signature ok
subject=/C=US/ST=California/L=San Jose/OU=sdwan-testlab/O=Viptela LLC/CN=vsmart-5ade0771-9aa7-4bef-a46b-8ad27b723251-0.viptela.com/emailAddress=support@viptela.com
Getting CA Private Key
This will create a certificate file called vsmart.crt . cat the contents of the vsmart.crt file in order to copy and past the contents to the vManage in the next step.
Navigate to the certificates page and install the vSmart certificate by pasting in the contents of the vsmart.crt file and click Install.
If it was successful you will see a success message similar to the below.

Finally activate the control plane tunnel on the eth1 interface.
config
vpn 0
 interface eth1
  tunnel-interface
  !
  no shutdown
 !
!
commit and-quit
!
Confirm that control connections are active between the vSmart, vBond and vManage.
show orchestrator connections

# output
                                                  PEER                      PEER
     PEER
      PEER    PEER PEER            SITE       DOMAIN PEER                                    PRIV  PEER                                    PUB
INDEX TYPE    PROT SYSTEM IP       ID         ID     PRIVATE IP                              PORT  PUBLIC IP                               PORT  REMOTE COLOR     STATE UPTIME
---------------------------------------------------------------------------------------------------------------------------------------------------------------------------------------
0     vbond   dtls 0.0.0.0         0          0      172.16.255.2                            12346 172.16.255.2                            12346 default         up     0:00:01:22
0     vmanage dtls 1.1.1.1         1000       0      172.16.255.1                            12346 172.16.255.1                            12346 default         up     0:00:01:13
1     vbond   dtls 0.0.0.0         0          0      172.16.255.2                            12346 172.16.255.2                            12346 default         up     0:00:01:22
To exit the console use one of these key combinations (Assuming English keyboard).
- CTRL + ]
- CTRL + 5
- Press and hold CTRL and SHIFT while pressing 6 then ]
Now with the controllers out of the way, let move onto the WAN edge devices.
WAN Edge List
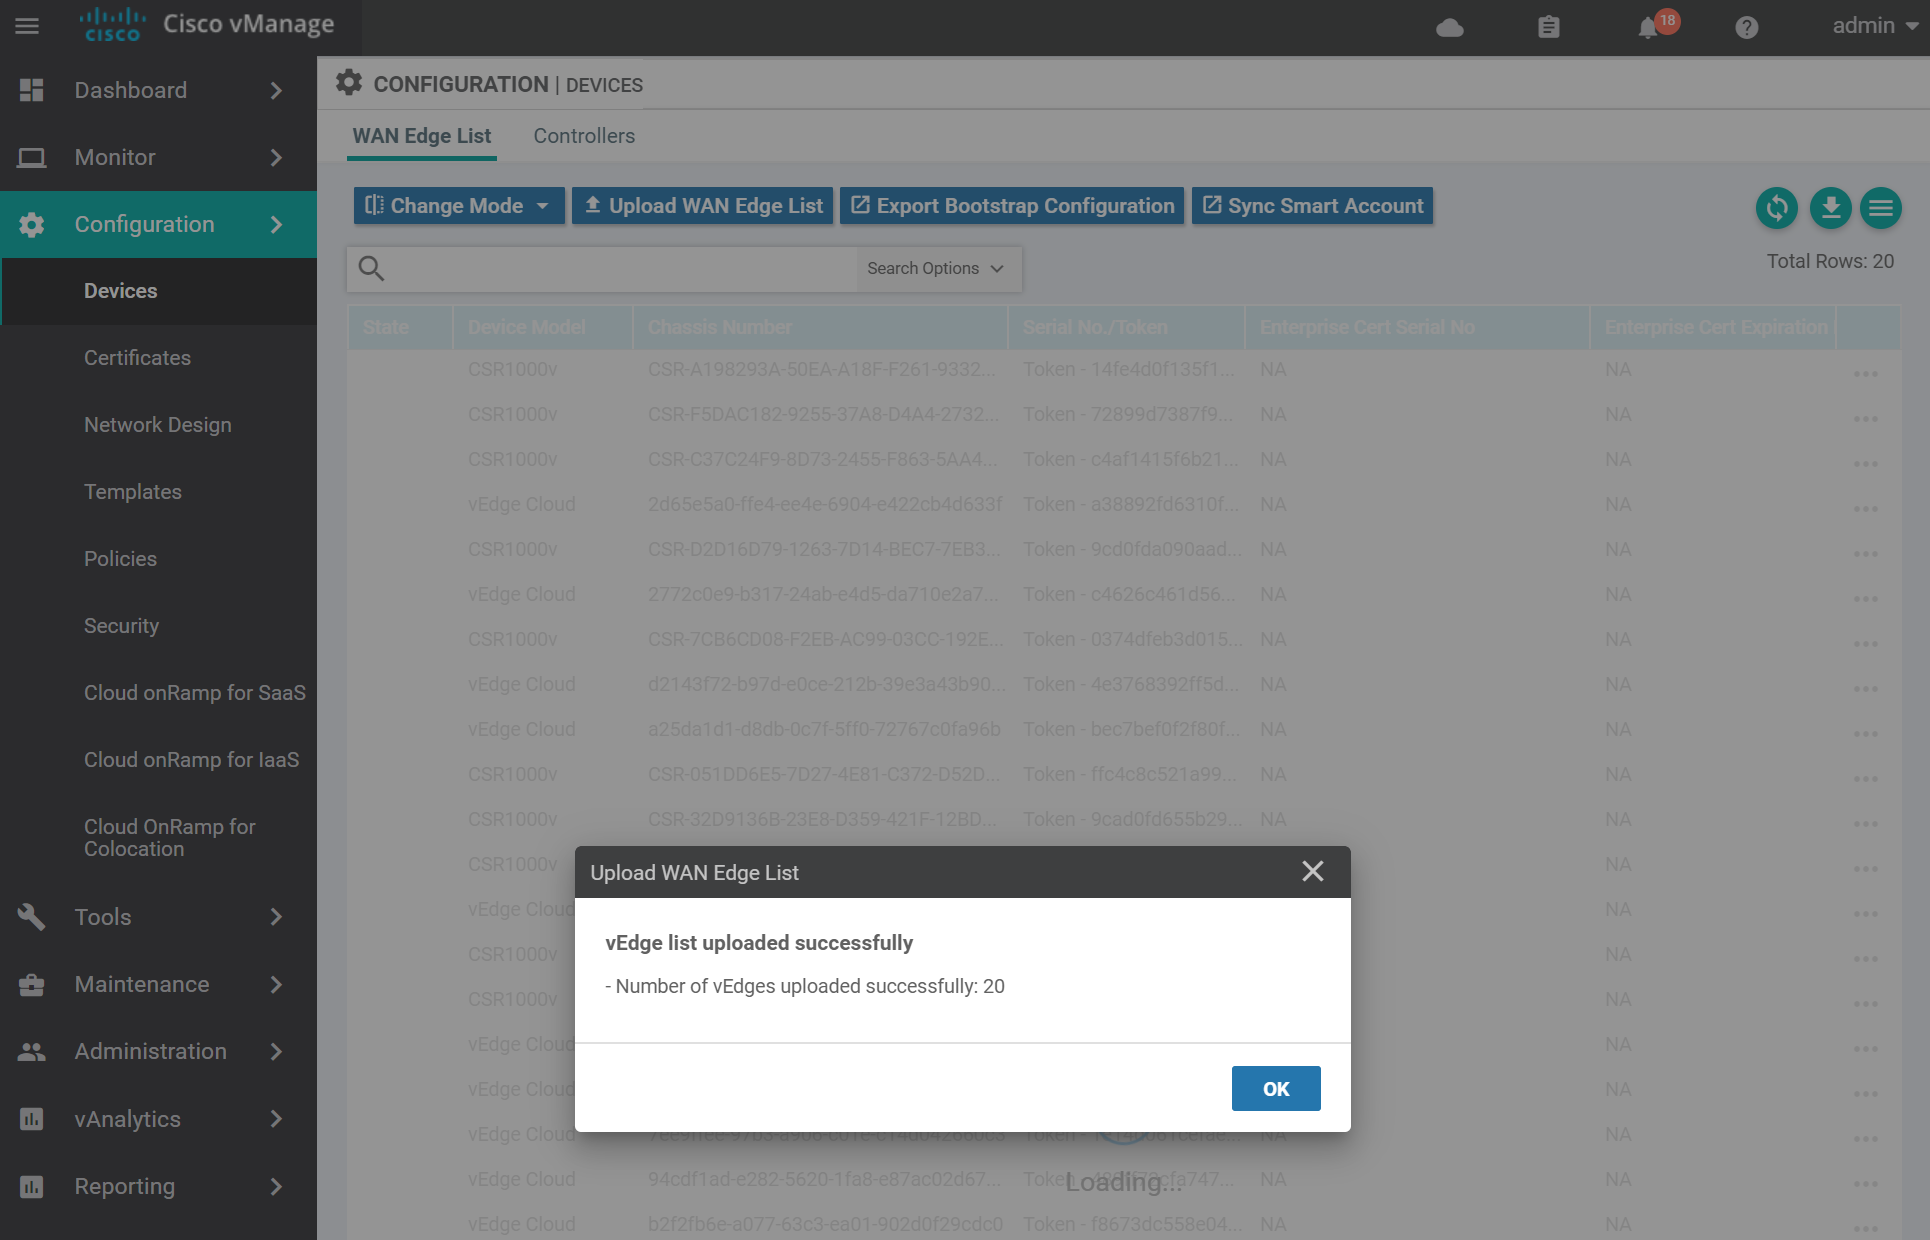
Do you remember in part one when I said to keep the serial file safe for a later time? Now is that time! In order for WAN edges to join the fabric, you need to upload the serial file generated in part one of this series.
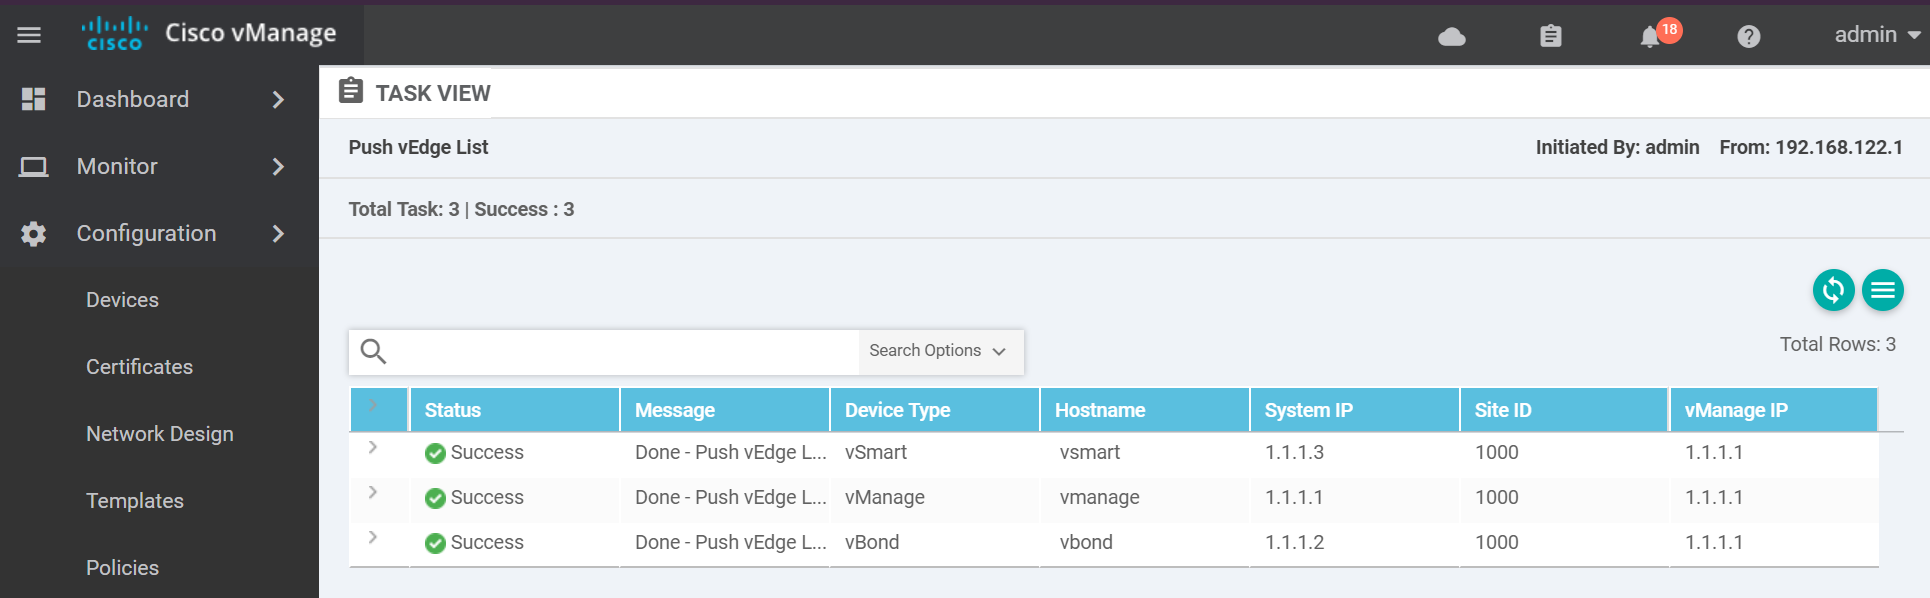
Navigate to the devices page and upload the serial file from the location you save it to previously. Keep the box ticked to validate the list and send to controllers.

A success message looks similar to the below.
vEdge
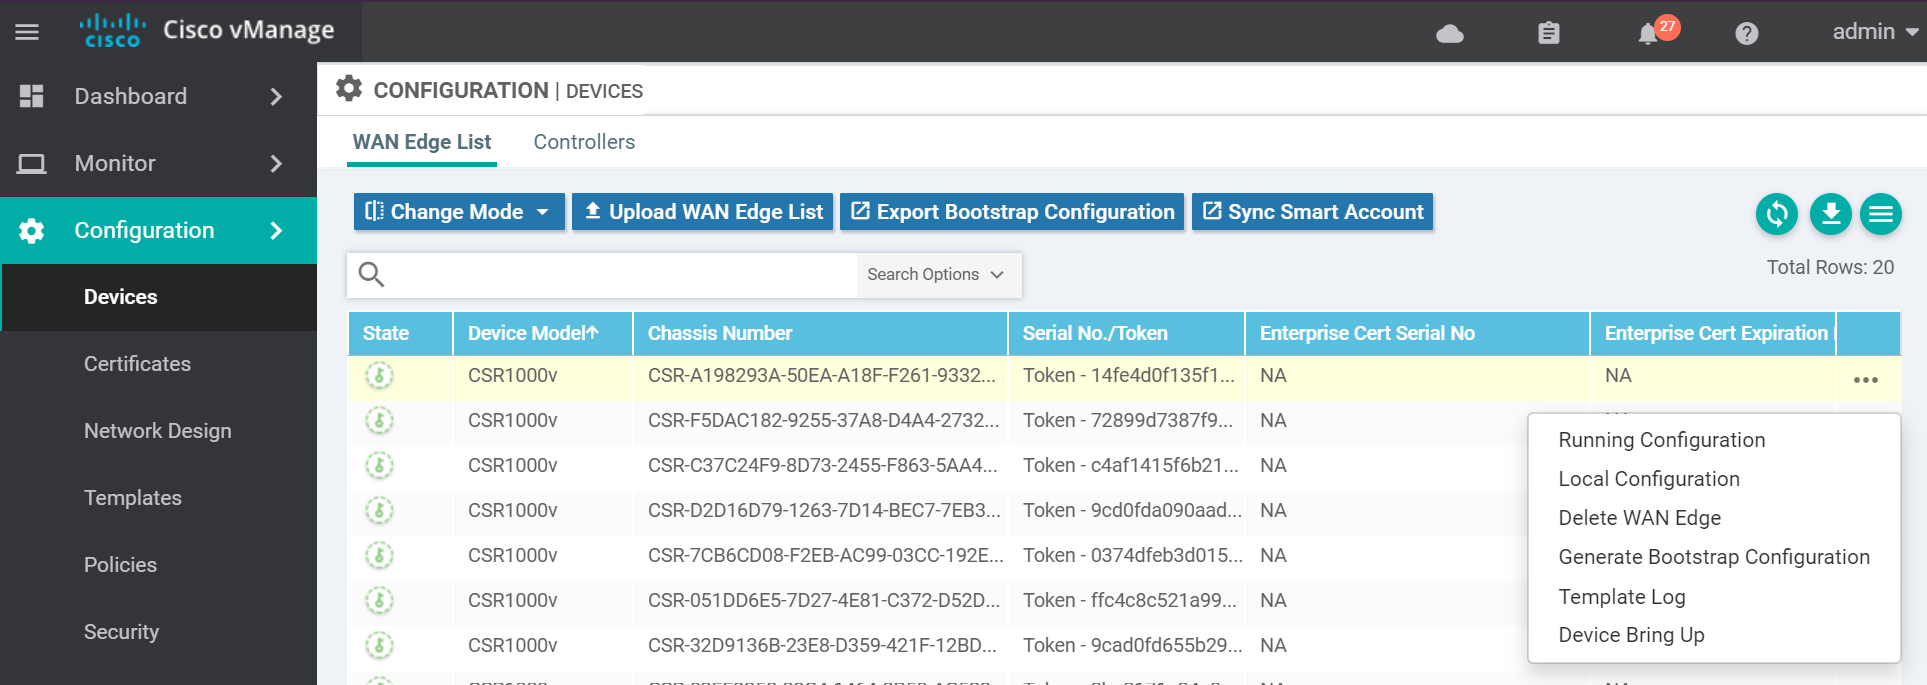
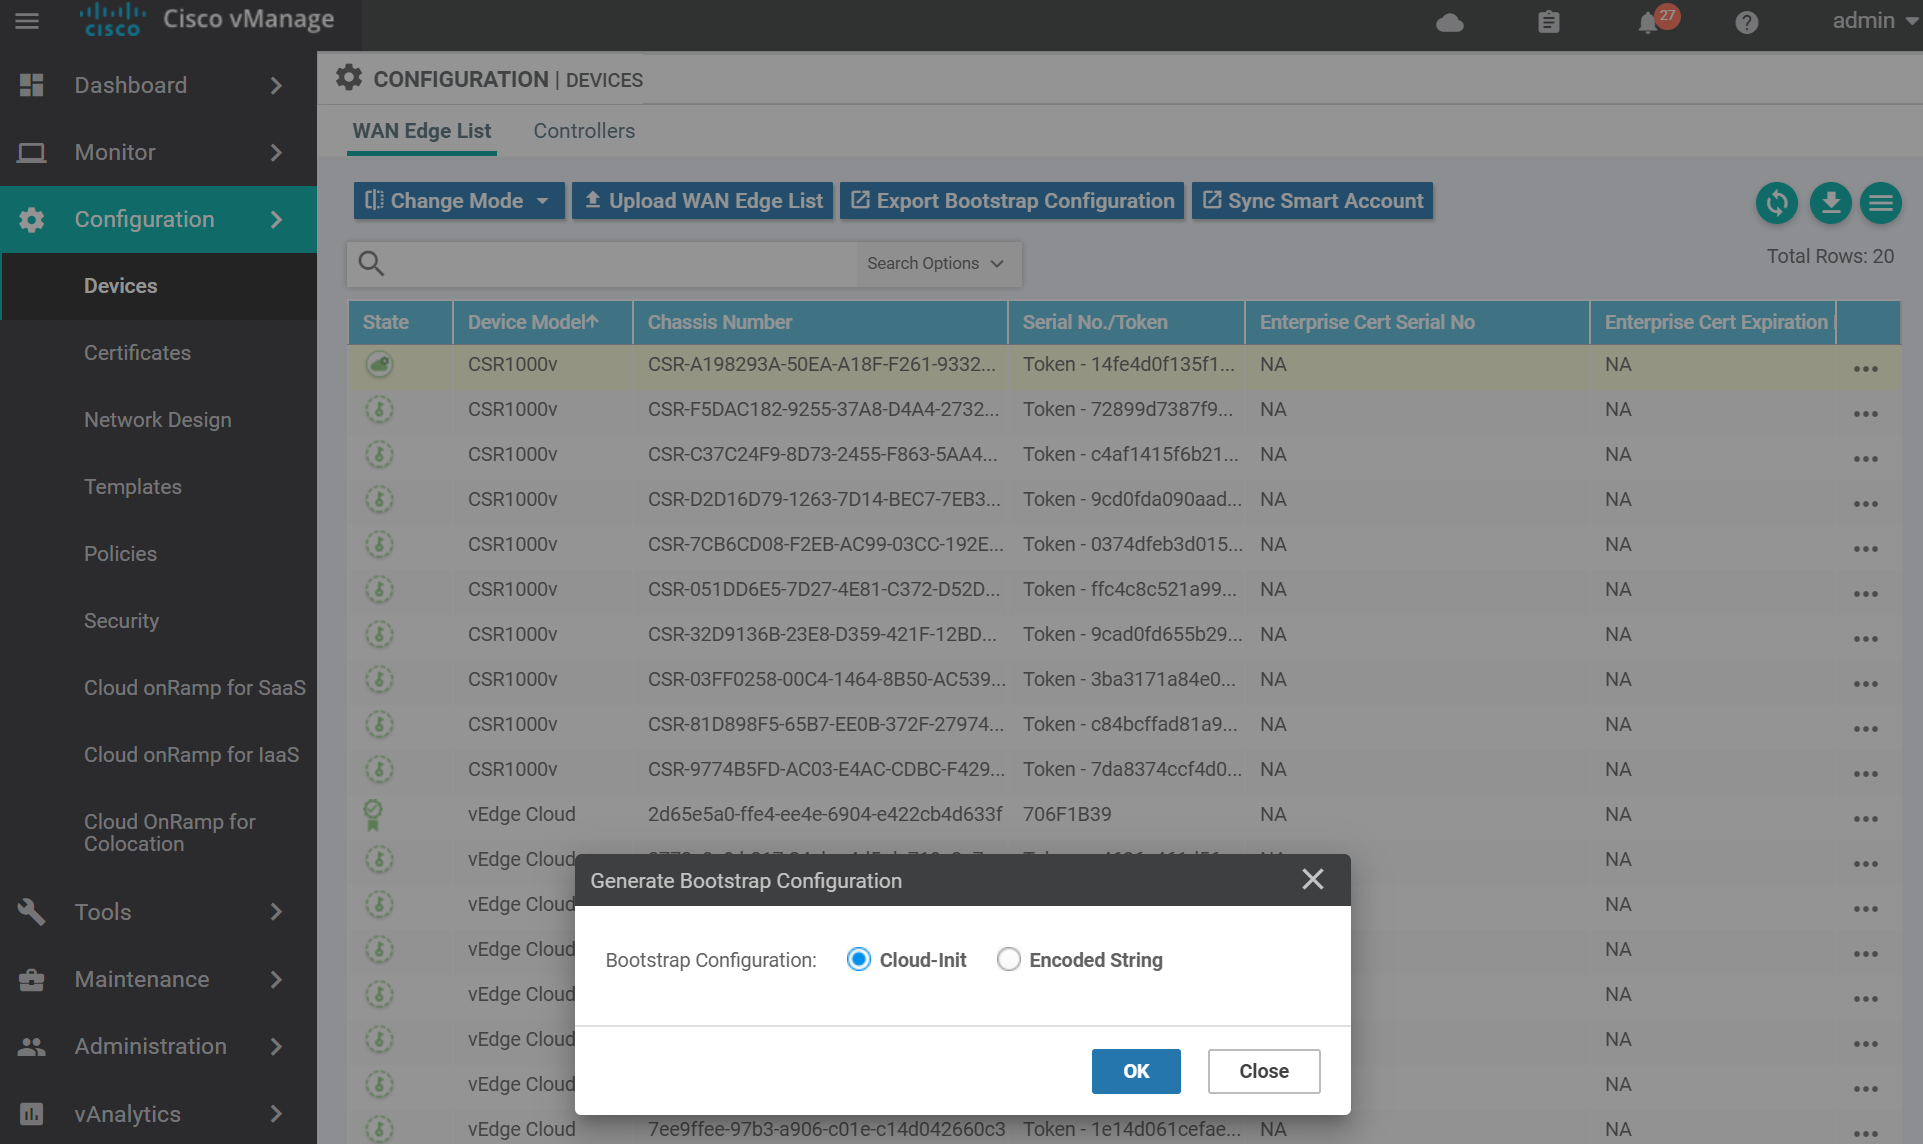
To add a virtual edge you need to generate a bootstrap file. Navigate to the devices page.
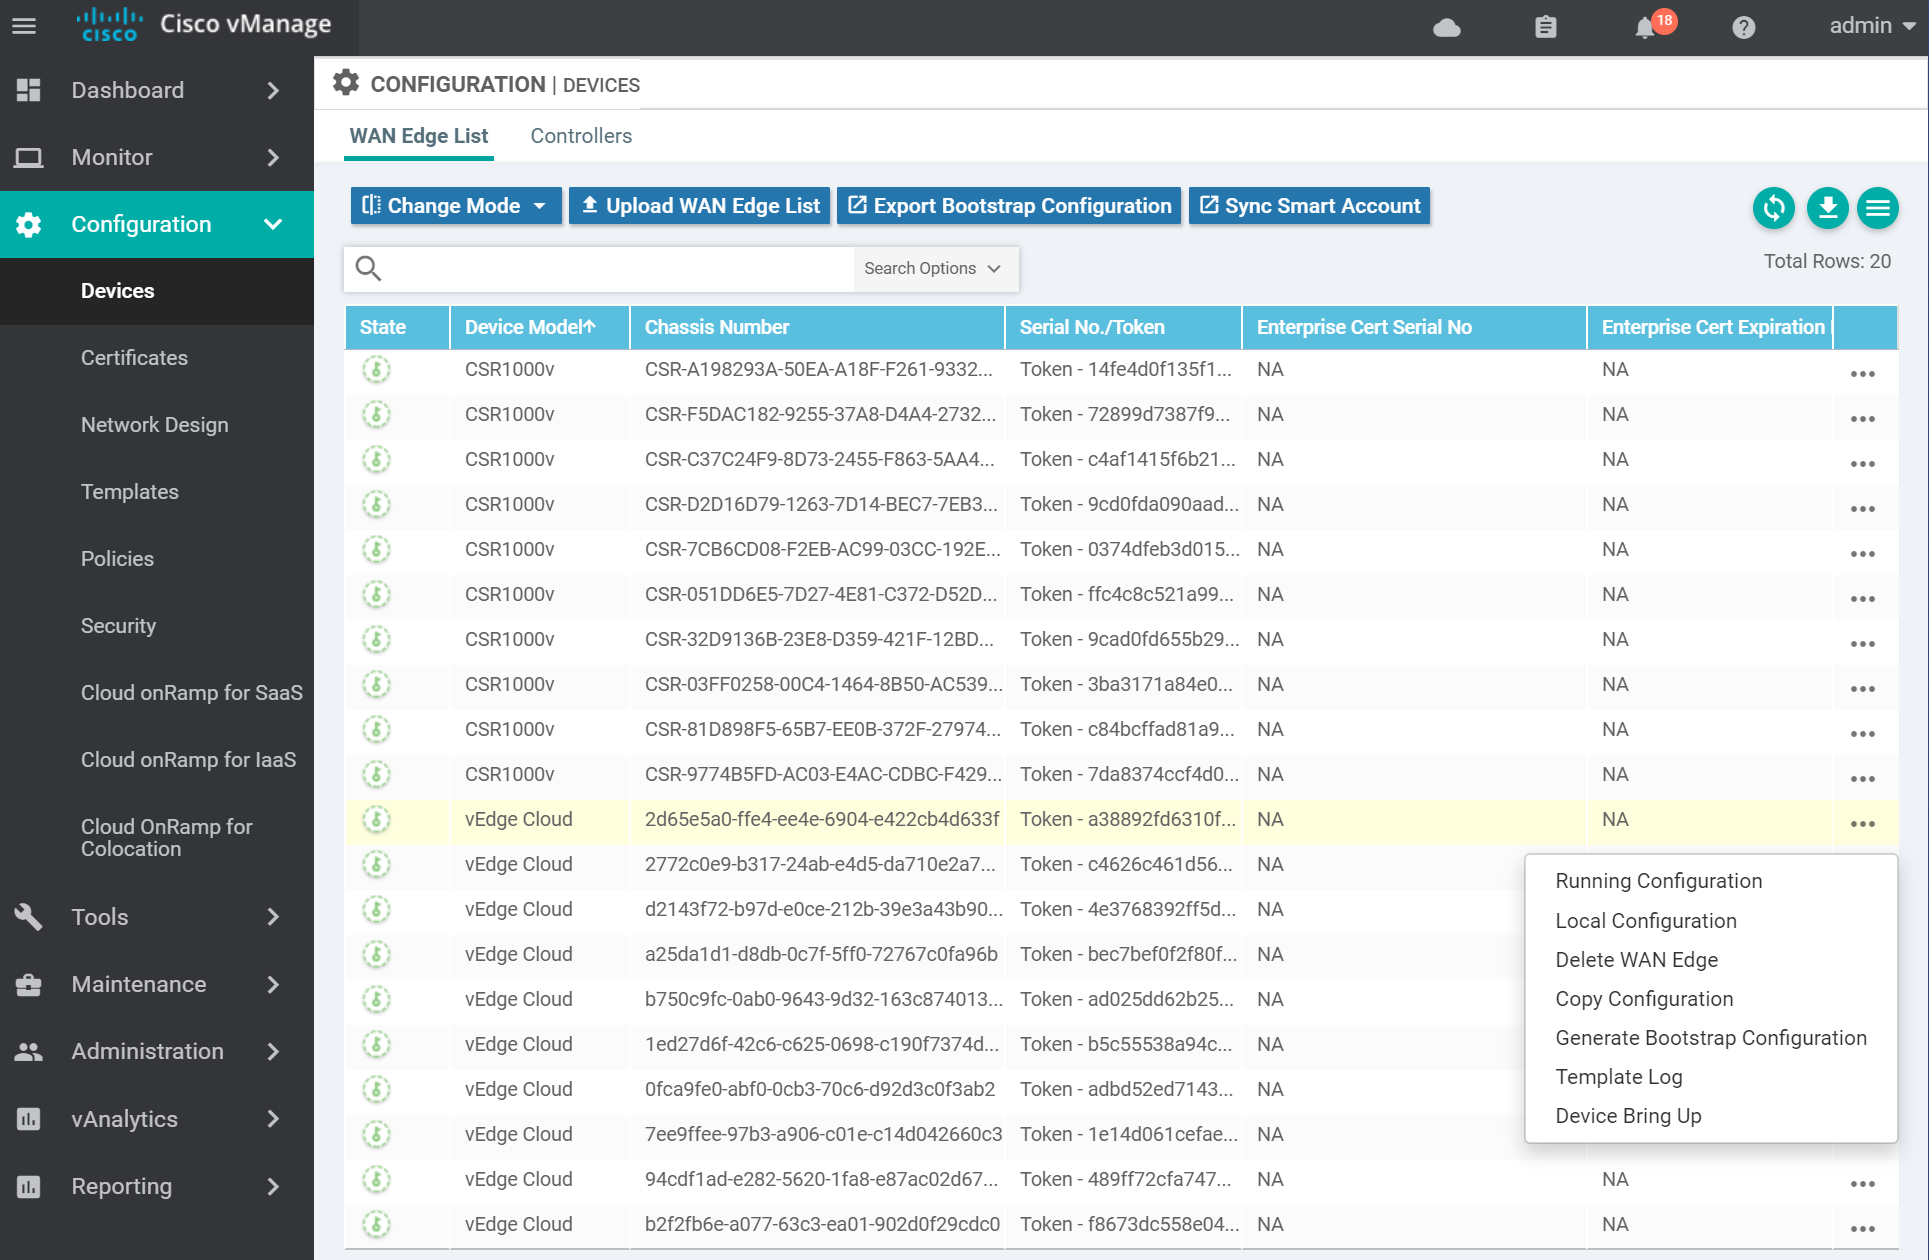
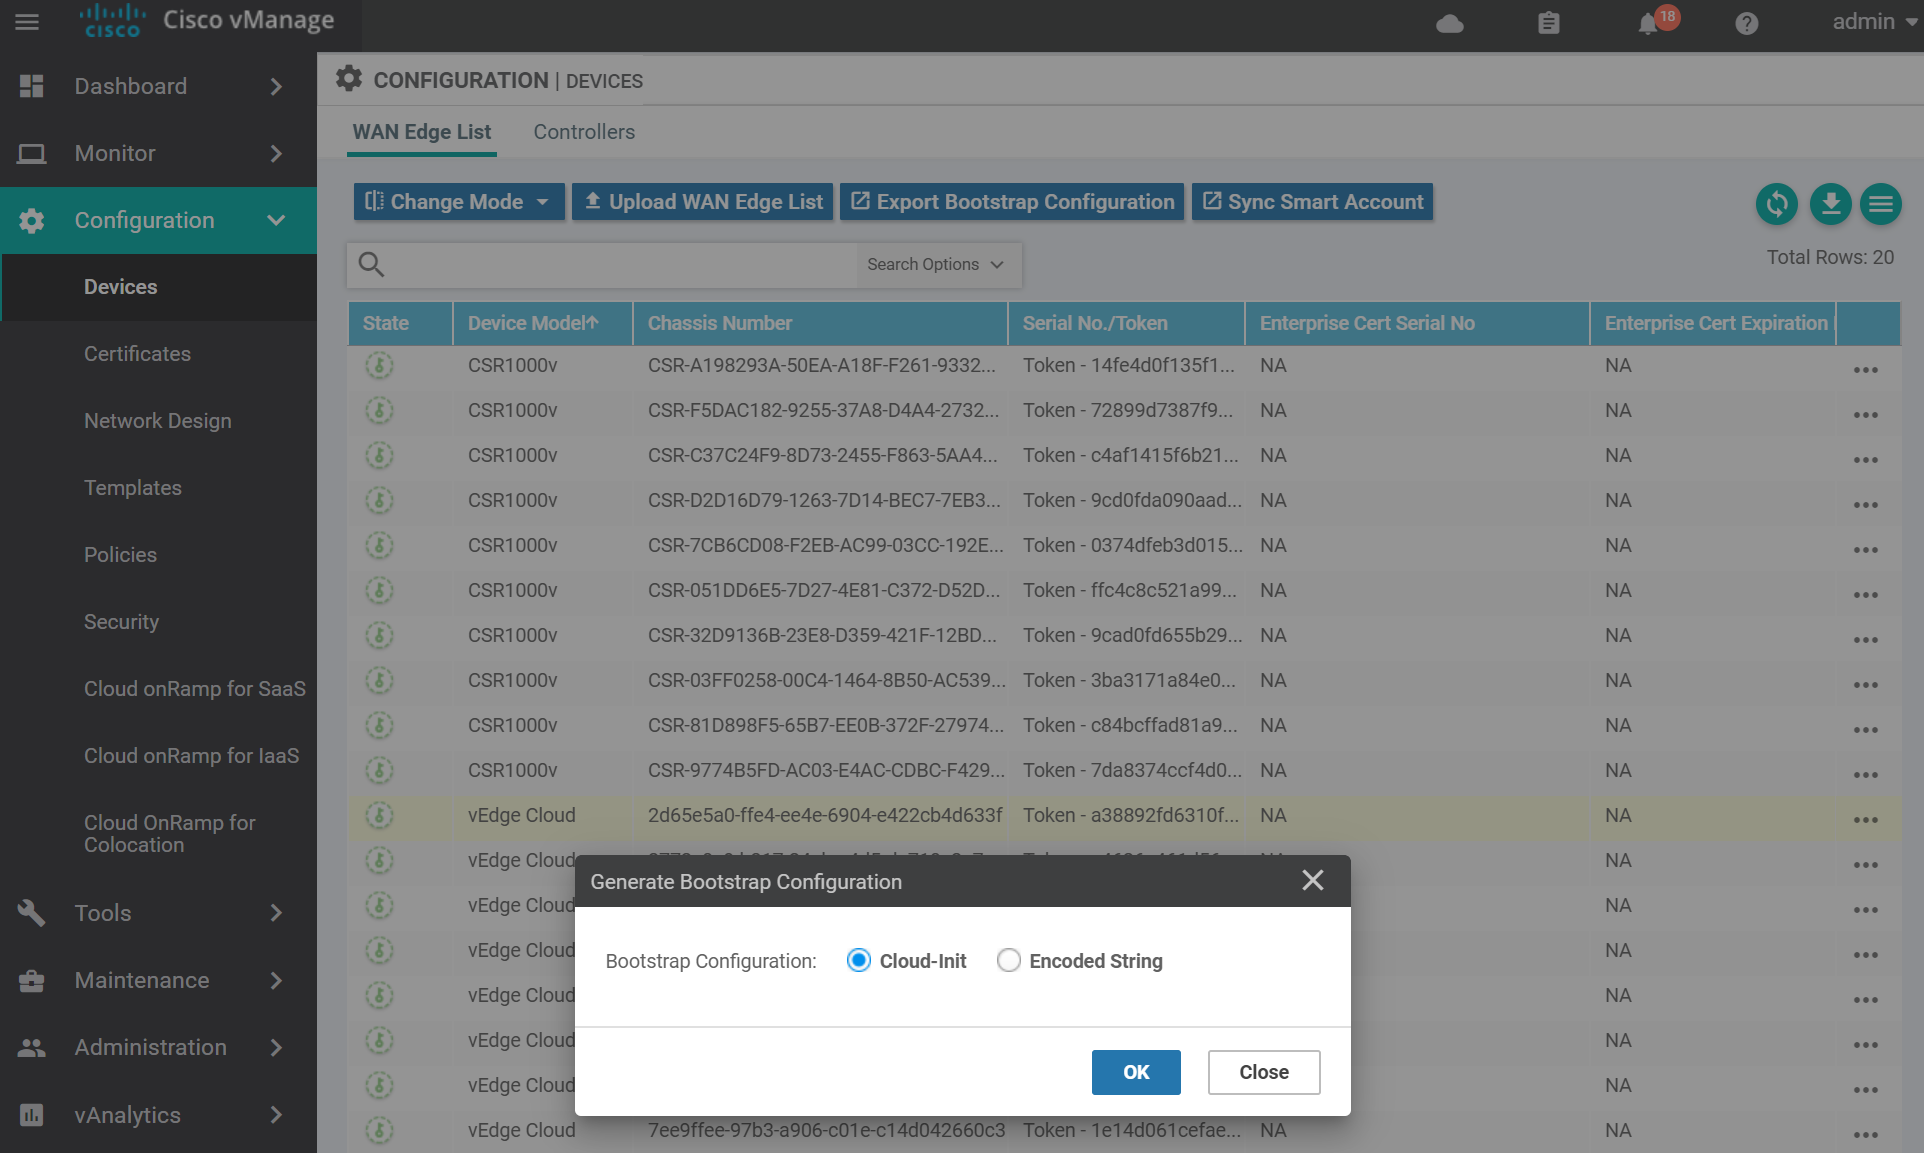
For KVM select Cloud-Init . (VMWare uses Encoded String). Then click OK.
You can either download the file and SCP it across to the host server, or copy and paste the contents via a terminal to the server. Use the method you are most comfortable with.

On the host server, create and ISO image from the cloud-init file that can be mounted to the vEdge on boot. I named the file vedge.cfg and copied it to the working directory.
cloud-localds config.iso vedge.cfgBoot the vEdge with the config.iso disk attached. This will ensure that the image boots with the correct chassis number.
virt-install \
    --name vedge \
    --os-type linux \
    --os-variant ubuntu14.04 \
    --cpu host \
    --vcpus=2 \
    --hvm \
    --arch=x86_64 \
    --ram 2048 \
    --disk path=viptela-edge-19.1.0-genericx86-64.qcow2,size=16,device=disk,bus=ide,format=qcow2 \
    --disk path=config.iso,device=cdrom \
    --network=network:default,model=virtio \
    --network=network:default,model=virtio \
    --graphics none \
    --import
Once you see the message System Ready login with the username/password admin and apply the following bootstrap config.
config
system
 system-ip 3.1.1.1
 site-id 1
 organization-name "sdwan-testlab"
 vbond 172.16.255.2
!
vpn 0
 interface ge0/0
  tunnel-interface
   encapsulation ipsec
  ip address 172.16.255.11/24
  no shutdown
 !
!
vpn 512
 interface eth0
  ip dhcp-client
  no shutdown
 !
commit and-quit
!
Confirm that the chassis number is the same as the one from the cloud-init config.
show certificate serial

# output

Certificate not yet installed ... giving up.
Chassis number: 2d65e5a0-ffe4-ee4e-XXXX-XXXXXXXXXX serial number:
Install the Root CA cert by SCPing it from the vManage via the VPN 512 interface.
request root-cert-chain install vpn 512 scp://admin@192.168.122.129:/home/admin/ROOTCA.pem

# output

Uploading root-ca-cert-chain via VPN 512
Copying ... admin@192.168.122.129:/home/admin/ROOTCA.pem via VPN 512
Warning: Permanently added '192.168.122.129' (ECDSA) to the list of known hosts.
viptela 19.1.0

admin@192.168.122.129s password:
ROOTCA.pem                                    100% 1277     2.0MB/s   00:00
Updating the root certificate chain..
Successfully installed the root certificate chain
Now activate the vEdge using the chassis number and the one time password from the cloud-init file.
request vedge-cloud activate chassis-number 2d65e5a0-ffe4-ee4e-XXXX-XXXXXXXXXX token a38892fd6310f07c5XXXXXXXXXXXXIt will take a minute or two, but confirm that the control connections are active to the vManage, vBond and vSmart.
show control connections

# output

                                                                                       PEER                                          PEER                                          CONTROLLER
PEER    PEER PEER            SITE       DOMAIN PEER                                    PRIV  PEER                                    PUB                                           GROUP
TYPE    PROT SYSTEM IP       ID         ID     PRIVATE IP                              PORT  PUBLIC IP                               PORT  LOCAL COLOR     PROXY STATE UPTIME      ID
----------------------------------------------------------------------------------------------------------------------------------------------------------------------------------------
vsmart  dtls 1.1.1.3         1000       1      172.16.255.3                            12446 172.16.255.3                            12446 default         No    up     0:00:00:39  0
vbond   dtls 0.0.0.0         0          0      172.16.255.2                            12346 172.16.255.2                            12346 default         -     up     0:00:00:39  0
vmanage dtls 1.1.1.1         1000       0      172.16.255.1                            12446 172.16.255.1                            12446 default         No    up     0:00:00:39  0
cEdge
Navigate to the devices page to generate the bootstrap config for the cEdge.
For KVM select Cloud-Init . (VMWare uses Encoded String). Then click OK.
You can either download the file and SCP it across to the host server, or copy and paste the contents via a terminal to the server. Use the method you are most comfortable with.

Unlike the vEdge it does not look like you can mount a cloud-init ISO to set the initial boot parameters. The cloud-init config file will need to be named ciscosdwan.cfg and copied via SCP to the cEdge after it boots up.
Boot up the cEdge VM.
virt-install \
    --name=cedge \
    --os-type=linux \
    --os-variant=rhel4 \
    --arch=x86_64 \
    --cpu host \
    --vcpus=2 \
    --hvm \
    --ram=4096 \
    --disk path=csr1000v-ucmk9.16.11.1a-serial.qcow2,size=16,device=disk,bus=ide,format=qcow2 \
    --network=network:default,model=virtio \
    --network=network:default,model=virtio \
    --graphics none \
    --import
Once you see the VM is booted up login with the username/password admin .
Find the IP address of the GigabitEthernet1 so you can SCP the ciscosdwan.cfg file to the device.
show ip int brie

# output

Interface              IP-Address      OK? Method Status                Protocol
GigabitEthernet1       192.168.122.66  YES DHCP   up                    up
GigabitEthernet2       unassigned      YES unset  up                    up
Loopback65528          192.168.1.1     YES other  up                    up
From the host SCP the ciscosdwan.cfg file to the cEdge.
scp ciscosdwan.cfg admin@192.168.122.66:ciscosdwan.cfg

# output

Password:
ciscosdwan.cfg                                                                                    100%   25KB 598.1KB/s   00:00
Reset the SDWAN software in order for the chassis serial number from the ciscosdwan.cfg file to be applied to the device.
request platform software sdwan software resetOnce the router is back online, login and confirm that the chassis number is the same as the one from the ciscosdwan.cfg config.
show sdwan certificate serial

# output

Certificate not yet installed ... giving up.
Chassis number: CSR-A198293A-50EA-A18F-XXXX-XXXXXXXXXX serial number:
Apply the bootstrap configuration.
config-transaction
!
system
 system-ip             3.1.2.1
 site-id               2
 admin-tech-on-failure
 organization-name     sdwan-testlab
 vbond 172.16.255.2
!
hostname cedge
interface GigabitEthernet2
 no shutdown
 ip address 172.16.255.12 255.255.255.0
exit
interface Tunnel0
 no shutdown
 ip unnumbered GigabitEthernet2
 tunnel source GigabitEthernet2
 tunnel mode sdwan
exit
sdwan
 interface GigabitEthernet2
  tunnel-interface
   encapsulation ipsec
   color default
  exit
 exit
 !
!
commit
end
!
Install the Root CA cert by SCPing it from the vManage via the GigabitEthernet1 interface.
copy scp://admin@192.168.122.129 bootflash:

# output

Address or name of remote host [192.168.122.129]?
Source username [admin]?
Source filename [home/admin/ROOTCA.pem]? /home/admin/ROOTCA.pem
Destination filename [ROOTCA.pem]?
viptela 19.1.0


Password:
 Sending file modes: C0644 1277 ROOTCA.pem
!
1277 bytes copied in 1.790 secs (713 bytes/sec)
Now install the Root CA certificate.
request platform software sdwan root-cert-chain install bootflash:ROOTCA.pem

# output

Uploading root-ca-cert-chain via VPN 0
Copying ... /bootflash/ROOTCA.pem via VPN 0
Updating the root certificate chain..
Successfully installed the root certificate chain
The vEdge should be activated automatically, but if it is not you can do it manually using the the chassis number and the one time password from the cloud-init file.
request platform software sdwan vedge_cloud activate chassis-number CSR-A198293A-50EA-A18F-XXXX-XXXXXXXXXX token 14fe4d0f135f116cXXXXXXXXXXXXIt will take a minute or two, but confirm that the control connections are active to the vManage, vBond and vSmart.
show sdwan control connections

# output

                                                                                       PEER                                          PEER                                    CONTROLLER
PEER    PEER PEER            SITE       DOMAIN PEER                                    PRIV  PEER                                    PUB                                     GROUP
TYPE    PROT SYSTEM IP       ID         ID     PRIVATE IP                              PORT  PUBLIC IP                               PORT  LOCAL COLOR     PROXY STATE UPTIME      ID
----------------------------------------------------------------------------------------------------------------------------------------------------------------------------------------
vsmart  dtls 1.1.1.3         1000       1      172.16.255.3                            12446 172.16.255.3                            12446 default               up     0:00:02:47  0
vbond   dtls -               0          0      172.16.255.2                            12346 172.16.255.2                            12346 default               up     0:00:02:51  0
vmanage dtls 1.1.1.1         1000       0      172.16.255.1                            12446 172.16.255.1                            12446 default               up     0:00:02:51  0
And that's it. A functioning Cisco SDWAN lab with both vEdges and cEdges. Here is a couple of images of the finished product.
Outro
This was a pretty loooooonnnnngggg post. If you got this far, thanks for hanging in there. In this series of posts, we configured a Cisco SDWAN lab using an Enterprise CA with the vManage, vBond and vSmart controllers and both the cEdge and vEdge devices. If Cisco dCloud labs don't meet your needs, then building your own lab might. Until next time!
Links
https://stafwag.github.io/blog/blog/2019/03/03/howto-use-centos-cloud-images-with-cloud-init/
https://manpages.debian.org/testing/cloud-image-utils/cloud-localds.1.en.html